Tuesday, December 6, 2011

Pasta with Broccoli Rabe and Sausage


All I want to do is write about my dog.  But I am trying to stay focused here.  Pasta.  Broccoli Rabe.  Sausage.  Mix.  Eat.

That is really all there is to this recipe, which is why I like it.  In order to eat bitter greens like broccoli rabe, it is all about pairing it with something uber savory, salty and/or creamy.  Fat works too.  As you have probably noticed, lately I am all about quick and easy meals like this.  

Buy good, fresh sausage.  :D

Pasta with Broccoli Rabe and Sausage

1/4 cup olive oil
4 garlic cloves, peeled and chopped
1 lb. Italian sausage, casings removed and cut into bite size pieces
1 lb. broccoli rabe, blanched (see below)
1 cup broccoli rabe water (see below)
salt and pepper to taste
1 lb. pasta
Freshly grated Pecorino Romano cheese

Bring a pot of water to boil for cooking the pasta.

Heat oil and add garlic in a large sauté pan over medium heat. Add the sausages and sauté until meat is cooked and loses its raw look. Add blanched broccoli rabe.  Add rabe water and salt and pepper to taste. Increase heat to medium-high and cook until the contents are hot.

Meanwhile, cook pasta rapidly boiling salted water until al dente. Drain the pasta and return it to the pot. Place over medium-high heat and stir in 3/4 cup of broccoli rabe and sausage sauce. Using a wooden spoon, toss together for 1 minute. Remove from heat and pour into a large serving platter or bowl. Spoon remaining sauce over the top. Sprinkle with Pecorino Romano cheese.

Blanched Broccoli Rabe – (2 bunches)

Wash and dry broccoli rabe. Place broccoli rabe in a deep saucepan with cold water to cover by about 2 inches. Bring just to a simmer over high heat. As soon as bubbles appear at the sides of the pan, remove it from the heat. Reserve cooking water. Immediately place broccoli rabe in cold water to stop the cooking process. When broccoli rabe is cool, drain well in a colander and pat dry. Chop broccoli rabe into 2-3 inch pieces.

(Servings: 4, Prep time: 30 min., Cook time: 20 min., Difficulty: Easy)


foodforscot Ratings:

Shanon (taste):  6/10
Scot (taste):  7/10
Effort:  3/5
Dishwashing Effort:  3/5

Friday, December 2, 2011

Beef Stir Fry


Did you have a nice Thanksgiving?  Don't answer that.  It is rhetorical.  Conversation starter type thing.  Breaking the ice because I am pretty much a horrible updater.  

I had a great T-giving.  I think I might pass on a few of the recipes.  I think technically I am supposed to wait to do that until next year.  Like right before next Thanksgiving.  But let's be honest, there is no way that is happening.  

Here is a recipe that I never thought I would be sharing!  Beef stir fry is one of the first dishes I made on a regular basis.  Mostly because it is something I grew up eating a lot.  I went through a phase from when I was maybe 10 until I was 15 where I did not like cooked vegetables.  I ate salads and raw veggies.  I have always loved veggies.  But when my parents made a stir fry, I have vivid memories of putting rice on my plate and picking all the meat out of the wok to put on my plate.  

Everyone has problems.

But I have not made beef stir fry in a LONG time.  I think I was 'over it' for the past few years.  After spending time with some friends over Thanksgiving, I learned that real Asians prefer Jasmine rice (small sample size...two).  No but, I always buy regular long grain white rice.  Jasmine rice is a long grain rice but less sticky.  I actually like sticky rice.  But if I am told to try Jasmine rice, then I am going to!

So, I thought I would make good ol' beef stir-fry and eat it over some Jasmine rice.  Instead of just stir frying everything together and seasoning with soy sauce and red pepper flakes like I normally do, I looked to see how other people make beef stir fry.  I came across this recipe and it is about ten times better than what I normally make.  Scot and I were really surprised by how good it was and the amazing leftovers.

Are you wondering if I liked Jasmine rice better?  Well, I am going to leave that TBD.  Definitely less sticky.  But I wasn't really paying attention to whether I liked it better or not because I was really into the beef stir fry.  

NOTES:
-Subbing chicken would definitely work, although I prefer beef in stir fry.  All veggies would also be delicious.  
-You can use the stir fry beef sold at the meat counter if you want an even quicker meal.  
-Any combination of stir fry vegetables would be just fine.  But beef and broccoli really are a match made in heaven.  
-I have a rice cooker and it completes my life.  
-Call me ghetto, but I secretly like garlic powder.  You could leave it out of the marinade and add freshly grated garlic to the sauce.

Beef Stir Fry
adapted from Taste of Home, Ruth Stahl

3 tablespoons cornstarch, divided
1/2 cup water, plus
2 tablespoons water, divided
1/2 teaspoon garlic powder
1 lb sirloin roast/steak, cut into thin strips (helps to put it in the freezer for 10-20 minutes before slicing)
vegetable oil
1 package of Cremini mushrooms, sliced
1 small yellow onion, sliced
1 green bell pepper, sliced
1 red bell pepper, sliced
1 small head of broccoli, cut into pieces
1/3 cup soy sauce (reduced sodium)
1/2 teaspoon red pepper flakes, or to taste
2 tablespoons brown sugar
1 teaspoon ground ginger or 1 tablespoon freshly grated
Cooked Jasmine or long grain white rice

In a bowl, combine 2 tablespoons cornstarch, 2 tablespoons water and garlic powder until smooth. Add beef and toss.

Also, prepare the sauce by whisking together the soy sauce, red pepper flakes, brown sugar, ginger and remaining cornstarch and water until smooth. Set aside until you are ready to add it to the stir-fry.

In a large skillet or wok over medium high heat, stir-fry beef in oil until beef reaches desired doneness; remove from wok and set aside.

Add more oil and sauté mushrooms until they are very tender. Remove from wok and set aside.

Add more oil and stir-fry onion and peppers, about 4-5 minutes. Add broccoli and cook another 2-3 minutes. Return the mushrooms and beef to the wok and finally, add the sauce. Cook for a few minutes until the sauce thickens up. Serve over rice.

(Servings: 4, Prep time: 20 min., Cook time: 30 min., Difficulty: Easy)


foodforscot Ratings:

Shanon (taste):  9/10
Scot (taste):  8/10
Effort:  2/5
Dishwashing Effort:  2/5

Tuesday, November 15, 2011

Lemon and Olive Quinoa Cakes


I am pretty deece at planning ahead and organizing my life.  But at the same time, I feel like I am always doing everything last minute.  Sometimes I wonder if I should just redefine what last minute is so that I am more satisfied with my preparation for things.  Maybe I should decide that "last minute" is literally a minute before something needs to be done.  That way when I am up until 3 am working on something, I can feel like I am doing things way ahead of time. 

What I am talking about:  Thanksgiving.  This is the first time I will be making the meal, at least, the whole meal.  And there is no doubt in my mind that I will be up until midnight on Wednesday night getting ready for Thanksgiving the next day.  I think I will do my family proud by keeping the essentials on the table, but also trying some new things.  Want to know my current menu?  Here is what I am doing:

-Alton Brown's Brined Turkey - I ordered a fresh turkey.  I will let you know if it was worth it.  This recipe is killer.  
-Gravy (just from the Turkey drippings and some homemade chicken stock) - my dad disagrees with my method, he likes to add milk.  
-Mashed Potatoes - I just do cream cheese, butter, cream, salt and pepper.  Just like my mom taught me.  
-Orange-Cranberry Sauce - a classic.  
-Smoked Chile Scalloped Sweet Potatoes - You know my sweet potato dilemma, I am going spicy.  
-Sausage and Kale Stuffing - I struggled with what kind of regular bread stuffing to make and went this which is full of veggies (kale and butternut squash) and other non-bread items like sausage.  
-Cornbread, Leek, Bacon, Apple, and Pecan Stuffing - Cornbread stuffing with apples and bacon is my favorite!
-Soft Knotted Rolls - these might not happen.

Dessert:  Pumpkin Pie from the Flour cookbook (here is close recipe) with whipped cream

Probably too much.  I mean, definitely too much.  But ya know.  

Have I ever told you the story of my sister and her pumpkin pie?  Several Thanksgivings ago, my sister made the pumpkin pie.  And it was a big deal because she made the pumpkin puree from scratch.  One day there was a little pumpkin on the counter.  The next day there was a pumpkin pie on the counter.  So...we all praised her from making her pie from scratch.  And we also all went on and on about how good it tasted.  Only to find out (I think, several years later), that the pumpkin puree didn't work out and she actually just made it from a can.  I have never been able to trust her since.  (For the record, she insists that what I have explained here isn't even what happened.  Don't listen to her.)

The bottom line is:  there is very little evidence that fresh pumpkin puree makes any difference.  However, I still made some to make my pie from (Aunt Linda always does it, so shall I).  Pumpkin pie is on my "Thanksgiving only" list, so I thought I should do it justice.

Anyways, as usual, this discussion has nothing to do with the recipe I am posting.  I have made quinoa cakes a few times before, but I always just make it up as I go, so I never have a recipe to share.  I enjoy throwing quinoa cakes into a weeknight meal mix.  They aren't that quick to make from the start, but once you have to mixture made, they make a really quick dinner.  And I LOVE them with a green salad and a delicious dijon based vinaigrette.  As with any veggie based cake, they can be a little finicky and fall apart easily.  For the last 500 cakes that this recipes makes, I ended up heating oil in a non-stick skillet and then just putting an thin, even layer of the quinoa mixture over the entire skillet.  I crisped up the first side and then just kind of broke it up to flip it in pieces.  It isn't pretty.  But just as good.  And I was hungry.  PS:  These do NOT taste half as good without the salad and vinaigrette.  Necessary.


Lemon and Olive Quinoa Cakes
adapted from Joy the Baker

1 1/2 cups raw quinoa
2 1/4 cups water
1/2 teaspoon salt
4 large eggs, beaten
1 medium yellow onion, finely chopped
4 cloves garlic, finely chopped
1/2 cup grated parmesan or Gruyere cheese
1/3 cup coarsely chopped green olives
1/3 cup chopped parsley or green onions
1 tablespoon lemon zest
1 cup panko bread crumbs
1/2 teaspoon salt
1/2 crushed red pepper flakes
1 tablespoon water
olive oil

In a medium saucepan place quinoa, water, and 1/2 teaspoon salt. Place over medium heat and bring to a boil. Cover, decrease the heat, and simmer for about 20 minutes, until the quinoa is tender. Remove from heat and allow to cool to room temperature.

In a small bowl, whisk eggs and set aside. In a large bowl, toss together onion, garlic, cheese, olives, parsley, lemon zest, bread crumbs, salt, pepper, and cooled quinoa. Add beaten eggs and stir until all of the quinoa mixture is moistened.  Add water to thoroughly moisten mixture. Quinoa should be slightly wet so it doesn’t dry out during cooking.

Scoop out mixture by the 2 tablespoonful. Use clean, moist fingers to form into a patty. Create as many patties as you’d like.

In a large skillet over medium heat, heat olive oil. If you pan is large enough, add four to six patties to the hot pan. You’ll need a bit of room to successfully flip them.

Cook on each side until beautifully browned, about 4 to 5 minutes on each side. Low heat helps the quinoa cakes cook slowly. Brown on each side then remove to a paper towel lined plate.

Serve warm with a small spinach salad, or with scrambled eggs. Also, the quinoa mixture can be left, uncooked in the fridge for a few days. Cook as necessary.

(Servings: 6, Prep time: 45 min., Cook time: 30 min., Difficulty: Easy)


foodforscot Ratings:

Shanon (taste):  8/10
Scot (taste):  8/10
Effort:  3/5
Dishwashing Effort:  3/5

Sunday, November 13, 2011

Green Israeli Couscous


Have I talked yet about feta?  Until a few years ago, I always bought pre crumbled feta.  It was just easier to sprinkle it in.  But also, I used to shop where there were just two options:  crumbled and not crumbled.  Same brand usually, just two options.  And whether IIII crumbed it myself or not, it always tasted the same.  

But please listen to me people: don't buy feta that way.  It is so dry.  So chalky.  And while that salty bite is nice, the real deal feta is 3000 times better.  


The real deal that I am talking about is the block of feta that sits in a liquid (like fresh mozzarella).  I wish I had a picture, but I am not that smart.  It is so soft, full of moisture, but still has the salty, tangy wonderfulness that we all need in our feta.  It is so good you would actually want to eat it by itself.  Go for it!  I promise you will be happy you did.  

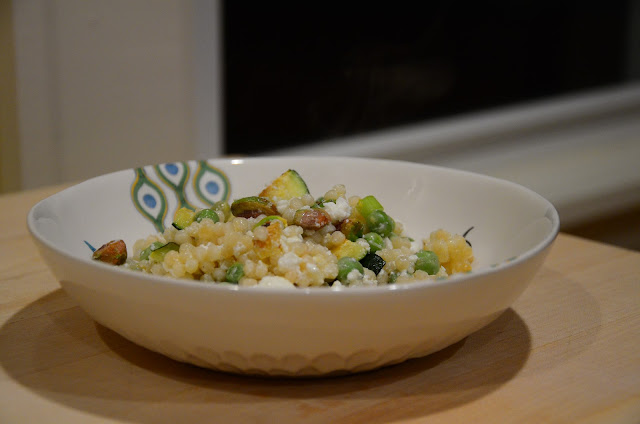
Using a good feta is probably crucial to our 9 and 10 ratings.  The Israeli couscous is tossed with feta, peas, sauteed zucchini, pistachios, and some lemon zest and juice.  I used fresh English peas, but frozen wouldn't be detrimental to the dish.  I just think this mixture is perfect.  

Also, pistachios are close to my heart.  I have fond memories sitting around the table with my family, and especially with my grandma, shelling and eating pistachios.  I remember one particular time when my grandma and I were eating them and talking about how good they were and my grandma told me they were bad for us or had a lot of fat in them, something like that.  And I asked her why.  She goes, "anything that tastes this good, can't be good for you."  Amen.  But, then again, when I was really young I asked my grandma if there was fat in water and she goes, "Honey, there is fat is grandma's water."


Green Israeli Couscous
based off of Joy the Baker

3 cups water
1 1/2 cups dry Israeli Couscous
generous pinch of salt
1 zucchini, diced
2 cups fresh English peas, boiled in salted water for about 5 minutes and drained
4-5 green onions, sliced
1 teaspoon lemon zest
1/2-1 cup crumbled feta cheese
1/2 cup roasted and salted pistachios
salt and coarsely ground black pepper to taste
about 3 tablespoons olive oil
about 2 tablespoons fresh lemon juice

In a medium saucepan, bring three cups of water to a boil. Add a generous pinch of salt, followed by Israeli couscous. Stir and reduce heat to a simmer. Simmer until couscous is just tender, with a slight bite, about 10 to 13 minutes. Drain into a fine mesh strainer and set aside.

In the meantime, in a large skillet, sauté the zucchini in a little bit of olive oil for about 5 minutes. Add cooked couscous and cooked peas. Toss with the rest of the ingredients, taste and add more salt and pepper as necessary.

(Servings: 4, Prep time: 20 min., Cook time 30 min., Difficulty: Easy)


foodforscot Ratings:

Shanon (taste):  9/10
Scot (taste):  10/10
Effort:  2/5
Dishwashing Effort:  2/5

Tuesday, November 8, 2011

Chicken Tikka Masala


I am really into Indian food right now.  I have always liked it, but there is an Indian restaurant that I have gone to for lunch several times in the past month and I am now hooked.  There are two things that draw me to Indian food:

1.  I love the ginger, garlic, yogurt, and other fresh flavors paired with all the warm spices like cloves, cinnamon, cumin, nutmeg, etc.  

2.  It is so vegetarian.  And healthy!

This is my most Indian dish I have ever made.  And upon some Wiki research, I learned that this dish isn't really all that Indian.  It is British?  And the most popular British dish at that.  I have never been to the UK, so I guess I will need to verify that at some point in my life.  But it definitely has some Indian connections.  

And you know, I should have known this dish was not super authentic since it has chicken and cream in it.  Not vegetarian and not overly healthy like most of the dishes I have had are.  BUT, it is delicious and has the warmth that I like so much about Indian food.  And I think this would be perfectly delicious if you just substituted a couple of cans of chickpeas for the chicken.  

I was recently having dinner with some new friends and this is an exact quote from our wonderful conversation:

"A turkey club is too ethnic for my mom."

If you are like my new friend's mom...that is, a little hesitant to trying ethnic food, this is the perfect Indian dish to start with.  It has enough familiar flavors and ingredients like tomatoes, chicken and cream that it is very comforting.  And with the wonderful combination of wintery spices, fresh ginger, garlic, it will knock your socks off.  Lastly,  go for the naan.  If you buy it from the bakery, make sure to grill it in some garlicy olive oil.

PS:  I added a new tab up there.  A little guide to weeknight meals.  Check it out!  

Chicken Tikka Masala
recipe courtesy Aarti Sequeira via Food Network

For the Marinade:
1 cup plain yogurt, whisked until smooth
3 tablespoons Ginger-Garlic Paste, recipe follows (or 1 tablespoon grated fresh ginger and 3 cloves garlic put through a garlic press or finely minced)
1 teaspoon kosher salt
1/2 teaspoon freshly ground black pepper
1 pound boneless, skinless chicken thighs, poked with a fork, and cut into large
bite-sized chunks

For the Sauce:
2 teaspoons olive oil
3 tablespoons butter
1/3 cup Ginger-Garlic Paste, recipe follows (or 6 cloves garlic and 2-inch thumb ginger minced)
2 serrano peppers, minced (seeds removed if you don't want it spicy)
2 tablespoons tomato paste
1 teaspoon garam masala
2 teaspoons paprika
8 Roma tomatoes, diced (I used a 28 ounce can of whole tomatoes)
1 1/2 teaspoons kosher salt
1 to 2 cups water
Oil, for grilling
1 tablespoon dried fenugreek leaves (optional)
1/2 cup heavy cream
Minced fresh cilantro, for garnish
Cooked rice, naan, or crusty piece of bread, for serving

For the marinade: In a large bowl, mix together the marinade ingredients. Add the chicken and toss to coat. Marinate at least 30 minutes, or in the refrigerator up to overnight.

For the sauce: When you're ready to make the curry, place a large skillet over medium heat and add the olive oil and butter. When the butter has melted, add the Ginger-Garlic Paste and serrano peppers. Saute until lightly browned around the edges. Add the tomato paste and cook until the tomato has darkened in color, about 3 minutes. Add the garam masala and the paprika and saute for about 1 minute to draw out their flavors.

Add the tomatoes, salt, and 1 cup water. Bring to a boil, turn down to a simmer, and cook until thickened, about 20 minutes. You may need more water depending on how much liquid the tomatoes give off.

Meanwhile, fire up your grill. When it is nice and hot, lightly brush it with oil. Place the chicken on the grill, shaking off some of the excess marinade. Cook until it's charred, about 2 minutes on each side. (Don't worry that the chicken will still be a little uncooked, it finishes cooking in the sauce).

Pour the sauce into a blender or food processor, or use an immersion blender, and process until smooth. Pour back into the skillet and bring back up to a boil. Add the chicken and fenugreek leaves, if using. Take the heat down to a simmer and cook for about 10 minutes. Add the cream and stir through. Garnish with minced fresh cilantro, and serve over rice, with naan, or a crusty piece of bread!

Ginger-Garlic Paste

1/2 cup cloves garlic, whole
1/2 cup fresh ginger, peeled, cut into 1/2-inch slices
1/4 cup canola oil

Throw the garlic, ginger, and canola oil in a mini-food processor and let it go until it forms a semi-smooth paste. There will still be tiny little pieces in there, but overall, it should resemble a paste.

Save what you don't use in a small glass jar. It should last in the fridge for 2 to 3 weeks. It's a delicious addition to marinades, pasta sauces, stir fry sauces, slowcooker recipes, gravy etc. We always had a jar of this stuff in our fridge growing up.

(Servings: 4-6, Prep time: 1 hr., Cook time: 30 min., Difficulty: Easy)


foodforscot Ratings:  

Shanon (taste):  9/10
Scot (taste):  9/10
Effort:  3/5
Dishwashing Effort:  3/5

Monday, October 31, 2011

Oatmeal Pumpkin Chocolate Chip Cookies


Halloween.  Is today.  My dog is sleeping next to me and still wearing his pumpkin shirt.  He was supposed to be an alien, but I don't know if that ever happened.  

Fall has been weird this year.  I have been waiting on the edge of my seat for the colors to change.  Then, it happened.  And I am pretty sure I missed it.  Here is the only (semi decent) pic we have of the fall colors.


And then this happened (slightly different angle, but same spot more or less).


And before any of that happened, I was filling every second of my free time with Broadway shows.  I am not complaining, but weird October.  

I wouldn't say I did pumpkin justice this October (and I know I still have November), but I did make these cookies.  Ever since the pumpkin shortage several years ago, I am incapable of buying only one can of pumpkin puree.  So, I had all these ingredients on hand when I scheming up this mixture of oatmeal and pumpkin.  Yes, I am obsessed with oatmeal everything.  

I am also obsessed with pumpkin and chocolate together.  We have a local ice cream place that sells delicious pumpkin ice cream and I get it combined with the chocolate ice cream.  Not mixed.  Just side by side.  


Anyways, make sure you use extra fancy cinnamon.  Vietnamese cinnamon, that is.  These really won't turn out without it.  

Oatmeal Pumpkin Chocolate Chip Cookies
adapted from Simply Recipes

1 cup butter, room temperature
1 cup packed brown sugar
3/4 cup granulated sugar
1 cup pumpkin puree
1 large egg
1 teaspoon vanilla extract
1 cups whole wheat flour
1 cups all-purpose flour
1 1/3 cups quick or old-fashioned oats
1 teaspoon baking soda
1 teaspoon ground cinnamon
1/2 teaspoon salt
1 cup chopped pecans
1 cup semi-sweet chips

Preheat the oven to 350° F.

Beat the butter and sugars together until light and fluffy, about 3 minutes.

Add the egg, vanilla, and pumpkin puree and beat for another 3 minutes.

In a separate bowl combine the flours, oats, baking soda, salt, and cinnamon and whisk together. Slowly add it to the butter mixture until just combined, being sure to scrape down the sides and bottom once or twice to ensure even mixing.

Fold in the pecans and chocolate chips. Drop spoonfuls of dough on cookie sheets lined with parchment paper. Bake for 13-15 minutes. Allow to cool on the tray for a minute or two to set, then move to a wire rack to finish cooling.

(Servings: 48 cookies, Prep time: 30 min., Bake time: 1 hr, Difficulty: Easy)


foodforscot Ratings:

Shanon (taste):  7/10
Scot (taste):  8/10
Effort:  2/5
Dishwashing Effort:  3/5

Thursday, October 27, 2011

Black Bean and Sweet Potato Tacos


If there is a taco recipe out there, I will probably try it.  If the taco looks like Halloween, I will probably try it in October.  

I will also put goat cheese on it.  Seriously, everything time I am involved, I add goat cheese.  When my sister ate these, she said "the goat cheese really makes it."  I sighed.  Doesn't it always?  

Halloween is coming up so I am supposed to making/posting ghost cupcakes and spider cookies.  But guess what?  That isn't my thing.  My kids will eat these tacos and I will pass out tooth paste on Halloween.  Or pennies.  No, jk.  I like candy.  My favorite is candy corn.  Only the yellow, orange and white ones.  No others.  And definitely not the dirty pumpkins.  

This reminds me of my friend (R^2/R) who LOVES the pumpkins.  He knows their official name, which is "mellow creme pumpkins".  True fan right there.  I should probably buy some halloween candy.  I oscillate between adult and teenager on an annual basis.  Next year I will totally have the candy bought at least two weeks in advance.  

Or at least a week.  


Black Bean and Sweet Potato Tacos

For the Potatoes:
2 sweet potatoes (really orange-fleshed yams), peeled and cut into small cubes
1 tablespoon olive oil
salt and red chili flakes to taste
juice of 1 lime

For the Cabbage Slaw:
2 heaping cups shredded cabbage (I used a combination of purple and green
cabbage)
1/4 cup finely diced yellow onions
2 heaping tablespoons chopped cilantro
juice of 2 limes
salt and red chili flakes to taste

For the Beans:
1 teaspoon olive oil
1/4 cup finely diced yellow onion
1 teaspoon ground cumin
1 (15-ounce) can black beans, drained and rinsed
juice of 1 lime
small corn tortillas

Place a rack in the center of the oven and preheat oven to 400 degrees F. Place peeled and diced sweet potatoes on a cookie sheet. Top with olive oil, salt and chili flakes, and lime juice. Toss together until all of the potato chunks are coated. Place in the oven to bake until softened through and toasted brown. This usually takes about 40 minutes. Remove the cookie sheet once or twice during baking to toss the potato chunks around. This will ensure that the cubes cook evenly. Remove from the oven and let stand when cooked through.

While the potatoes cook, assemble the Cabbage Slaw. In a medium bowl, place cabbage, yellow, and chopped cilantro. Add lime juice, salt and chili flakes. Toss to coat and set aside while the potatoes cook and beans heat. Letting the cabbage slaw sit will help soften the cabbage.

To cook the beans, heat olive oil in a medium saucepan. Add onions and cook until translucent, about 3 minutes. Add ground cumin and stir until fragrant.  Add beans and lime juice. Cook until heated through.

Heat corn tortillas in a hot saucepan with just a touch of oil. Heat through and serve with potatoes, beans, and slaw.

(Servings: 4-6, Prep time: 10 min., Cook time: 40 min., Difficulty: Easy)


foodforscot Ratings:

Shanon (taste):  7/10
Scot (taste):  8/10
Effort:  2/5
Dishwashing Effort:  2/5

Thursday, October 20, 2011

Halibut in Artichoke and Tomato Broth


We really enjoyed this simple dinner.  The artichokes in the broth give it this super acidic boom chicka bow wow.  

And I love a broth.  I am sleepy.  Bye!  Try this!


Halibut in Artichoke and Tomato Broth
recipe courtesy Giada De Laurentiis via Food Network

1 tablespoon olive oil, plus 3 tablespoons
4 (6-ounce) halibut fillets
1/4 teaspoon salt, plus more for seasoning fish
1/4 teaspoon freshly ground black pepper, plus more for seasoning fish
2 shallots, sliced into thin rounds
2 cloves garlic, minced
1 pound frozen artichokes, thawed
1/2 cup white wine
1 1/2 cups low-sodium chicken broth
1 (14.5-ounce) can diced tomatoes
1/2 teaspoon minced fresh thyme leaves

Drizzle 1 tablespoon of olive oil over the halibut and season with salt and pepper.  Heat a grill pan over high heat. Cook the fish on the grill pan until just cooked through, about 4 minutes per side, depending on thickness.

In a medium saucepan, heat the 3 tablespoons of olive oil over medium-high heat. Add the shallots and cook for 1 minute. Add the garlic and artichokes and cook until golden brown, about 5 minutes. Add the white wine and stir, scraping the brown bits off the bottom of the pan with a wooden spoon. Add the chicken broth, tomatoes and juice, thyme, and 1/4 teaspoon each salt and pepper. Bring to a simmer.

Ladle the artichoke and tomato broth into shallow bowls. Top with the grilled halibut. Serve immediately.

(Servings: 4, Prep time: 10 min., Cook time: 40 min., Difficulty: Easy)


foodforscot Ratings:  

Shanon (taste):  8/10
Scot (taste):  8/10
Effort:  2/5
Dishwashing Effort:  2/5

Sunday, October 16, 2011

Peppers Stuffed with Quinoa, Corn, and Feta Cheese


I added bacon to this and I am sorry.  This is a perfectly delicious vegetarian meal.  And I fully support that.  But I had some bacon in my fridge.  Bacon that I definitely should have put in my freezer so that I didn't convince myself to put it in every dish that it would work in.  But it so works in this dish.  

JSYK.  You can add it and it might be extra delicious.  

I seriously feel bad about the bacon.

I stuffed a variety of peppers including red bell, poblano and maybe anaheim(?).  Woah, look at me mixing things up.  I even stuffed a tomato.  

Every time I stuff things, I have way more stuffing than I have things to stuff.  But also, the stuffing is so delicious to just eat on its own.  I mean, you could even skip the pepper and just make the quinoa as a dish on its own.  

Wow.  Good flow in this blog post.  Sorry if this gave you a migraine.  


Peppers Stuffed with Quinoa, Corn, and Feta Cheese

sea salt and freshly ground pepper
1 cup quinoa (or in my case 3/4 cup quinoa and 1/4 cup bulgur)
2 tbsp olive oil
1 bunch of scallions, including 2 inches of the greens, thinly sliced
2 jalapeno chiles, finely diced
1 garlic clove, finely chopped
1 tsp ground cumin
4 ears worth of corn kernels (about 2 cups)
1 bunch spinach, leaves only
1/2 cup chopped cilantro
1/4 lb feta cheese, cut into small cubes
2 large red onions, thinly sliced into rounds
1/2 cup veggie broth or white wine
4 peppers

Bring 2 cups of water to a boil. Add 1/2 tsp salt, then the quinoa. Give it a stir, then cover and simmer over low heat until the grains are tender and reveal their spiraled germ, about 15 minutes.

Warm half the oil in a wide skillet. Add the scallions and chiles. Cook over medium heat for about 2 minutes, then add the garlic, cumin, corn, and spinach, along with 2 tbsp water. When the spinach is wilted, add the cilantro, quinoa, and feta and remove from heat. Toss everything together. Taste for salt and season with pepper.

Heat a tbsp of oil in a wide skillet. When hot, add the onions and saute, stirring frequently, until they start to color around the edges, after several minutes. Pour in the broth or wine and deglaze the pan, giving the onions a stir as you do. Season with salt and pepper and distribute in a baking dish large enough to hold the peppers.

Slice the peppers in half lengthwise. Cut out the membranes and seeds. Simmer in salted water until tender to the touch of a knife but not overly soft, 4-5 minutes. Remove. Fill them with quinoa mix and set them in the baking dish. Preheat oven to 400. Bake the peppers until heated through, 20 to 30 minutes, then switch the heat to broil and brown the tops. Serve hot, warm, or at room temperature.

(Servings: 4-6, Prep time: 1 hr., Cook time: 30 min., Difficulty: Easy)


foodforscot Ratings:

Shanon (taste):  8/10
Scot (taste):  8/10
Effort:  3/5
Dishwashing Effort:  3/5

Monday, October 10, 2011

Pumpkin Soup with Chili Cran-Apple Relish


I think we all know that eating fall squash is a requirement in October and November.  And it is a wonderful thing.  I have made this particular recipe several times over the past several falls and what I love about it is, first, it is so easy.  Second, I love the relish.  I have a weakness for soup toppings.  It has gotten to the point where every time I make a soup, I search long and hard for a garnish or topping.


The relish is everything the soup is not.  It is spicy and tangy and sweet.  The soup is creamy and has a subtle sweetness, but is mostly savory.  It has a deep flavor because of the chicken stock and fresh thyme (I always use fresh thyme in place of the poultry seasoning/ground thyme).    The other thing I change is I don't usually use the two cups of heavy cream.  I probably put less than a cup of half and half.  But, I never do the same thing and it is delicious every time.  Even though I love fat, I don't love really thick and creamy soups.  I am more of a broth girl.  

To pull an Ina on you, this soup is even more delicious when you use homemade stock and freshly roasted pumpkin.  Duh.  But it does make quite a difference.  However, don't be ashamed to pull out a few cans and make this for a quick week night dinner.  I have been out of homemade stock for a long time and it doesn't stop me.  Speaking of which, I need to stock up on that for Thanksgiving.  


Pumpkin Soup with Chili Cran-Apple Relish
recipe courtesy Rachael Ray via Food Network

For the soup:
1 tablespoon extra-virgin olive oil, 1 turn of the pan
2 tablespoons butter
1 fresh bay leaf
2 ribs celery with greens, finely chopped (save time and purchase celery already
washed, trimmed and cut into sticks, this makes chopping fast work)
1 medium yellow onion, finely chopped
Salt and pepper
3 tablespoons all-purpose flour
2 teaspoons poultry seasoning or 2 teaspoons ground thyme
2 teaspoons hot sauce, or to taste
6 cups chicken stock
1 (28-ounce) can cooked pumpkin puree
2 cups heavy cream
1/2 teaspoon freshly grated nutmeg

For the relish:
1 crisp apple, such as McIntosh or Granny Smith, finely chopped
1/4 red onion, finely chopped
2 tablespoons lemon juice
1/2 cup dried sweetened cranberries, chopped
1 teaspoon chili powder
2 teaspoons honey
1/2 teaspoon ground cinnamon

Heat a medium soup pot over medium to medium high heat. Add the oil and melt the butter. Add bay, celery, and onion. Season the veggies with salt and pepper.  Cook 6 or 7 minutes, until tender. Add flour, poultry seasoning and hot sauce, to taste, then cook flour a minute. Whisk in chicken stock and bring liquid to a bubble. Whisk in pumpkin in large spoonfuls to incorporate it into the broth.  Simmer soup 10 minutes to thicken a bit then add in cream and nutmeg. Reduce heat to low and keep warm until ready to serve.

While soup cooks, assemble the relish: combine apple, onion, lemon juice, cranberries, chili powder, honey and cinnamon.

Adjust seasonings in soup and relish and serve soup in shallow bowls with a few spoonfuls of relish.

(Servings: 4-8, Prep time: 20 min., Cook time: 30 min., Difficulty: Easy)


foodforscot Ratings:

Shanon (taste):  7/10
Scot (taste):  9/10
Effort:  2/5
Dishwashing Effort:  2/5

Tuesday, October 4, 2011

Wilted Bitter Greens with Crispy Walnut Goat Cheese


Breaded goat cheese?  Please.  You know I made this within 24 hours of recipe access.

You know I ate two disks of goat cheese with enough bitter greens necessary to eat two disks of goat cheese.  I don't recommend that.  It is hard to digest two disks of goat cheese. 

But one serving of this is like...super wicked good.  What I love the most about this recipe is that I have more goat cheese patties frozen in my freezer.  And I can just whip those babies up anytime I want.  At any given time, you can guarantee that my freezer will be pretty empty.  We usually have frozen fruit and sometimes a pint of ice cream.  I am not that good about freezing stuff (but even worse about eating the stuff I have frozen).  I can't wait to eat the rest of these!

PS:  I just followed the recipe as is after completely freezing them for several days before using them.  They turned out great!

Wilted Bitter Greens with Crispy Walnut Goat Cheese
by Anne Burrell via Food Network

For Goat Cheese:
3/4 cup walnuts
4 slices Pullman loaf bread, or other tight crumb white bread, crusts removed
1/2 bunch fresh chives, finely chopped
1/2 bunch fresh flat-leaf parsley, finely chopped
1 (11-ounce) log goat cheese, cut into 6 equal pieces
Kosher salt
2 eggs, beaten with 1 tablespoon water

For Salad:
Extra-virgin olive oil
1 shallot, minced
1 tablespoon Dijon mustard
2 to 3 tablespoons sherry vinegar
1 head radicchio, cut into bite-size pieces
2 cups baby arugula, washed
2 heads Belgian endive, cut into 1/2-inch lengths crosswise
Directions

For the goat cheese: In a food processor, pulse the walnuts until they are coarsely chopped. Tear the bread into pieces and pulse in the food processor with the chopped walnuts until they become coarse breadcrumbs. Transfer the breadcrumb mixture to a wide, flat dish. Stir in the chopped chives and parsley. Flatten each piece of goat cheese into a disk and season with salt. Dip each disk in the beaten egg mixture and then coat with the breadcrumbs, packing the crumbs onto each disk. When all the goat cheese has been coated, chill them in the fridge for at least 1 hour.

Preheat the oven to 200 degrees F.

To help facilitate the frying process, pop the disks in the freezer for 15 minutes before frying.

Coat a large, nonstick saute pan generously with olive oil and bring to a mediumhigh heat. Carefully fry the goat cheese disks in the hot oil on both sides until they are golden brown and crispy, about 2 minutes per side.

When all of the disks have been fried, keep them warm in the oven.

Remove the oil and any burned bits from the pan and give a splash of new oil. Reduce the heat to low, add the shallots to the pan, and let them cook as the pan cools slightly. Add the Dijon and sherry vinegar to the pan and whisk to combine. Add the radicchio, arugula, and endive and season with salt. Toss to fully incorporate with the vinaigrette and to allow the salad to slightly wilt. Taste to make sure it is delicious.

Divide the wilted salad between serving plates and top each salad with a goat cheese disk.

(Servings: 6, Prep time: 25 min., Inactive Prep time: 1 hr 15 min., Cook time: 25 min., Difficulty: Easy)


foodforscot Ratings:

Shanon (taste):  9/10
Scot (taste):  7/10
Effort:  3/5
Dishwashing Effort:  3/5