Showing posts with label shrimp. Show all posts

Tuesday, April 17, 2012

Black Bean and Shrimp Quesadilla with Edamame Guacamole


I think I have made this three times.  Often times if there is shrimp in a dish, I consider it optional.  But here, the shrimp is omega necessary.  The quesadilla is a combo of black beans, shrimp and cheese in a whole wheat tortilla.

Normally I am a seafood-and-cheese-never-together snob.  But I think shrimp tastes great with cheese.

Normally I don't like whole wheat tortillas, but lately I have been obsessed with them.  I buy Maria and Ricardo's.  Maria and Ricardo have skills.

Normally when I make guacamole, I profess that is the best thing on this great earth.  Guac contributes to my happiness.  Adding some edamame makes it less of a condiment and gives me an excuse to eat more.  Cara's original recipe actually blends the edamame into the guacamole in the food processor, which I am sure delicious, but I wanted something easier so I just tossed it all together.  And it is wonderful.


I miss this dish already.  Give it a try.


Black Bean and Shrimp Quesadilla with Edamame Guacamole
adapted from Prevention RD

15-20 medium shrimp, shelled and deveined
a pinch cayenne pepper
¼ tsp of paprika
1 can of black beans, drained and rinsed
1-4 tsp of chipotle in adobo puree
8 whole wheat tortillas
¼ cup cream cheese
1 cup Monterey Jack cheese, shredded
olive oil
salt and pepper
Edamame Guacamole, recipe follows

Season shrimp with salt, cayenne pepper and paprika.  In a non-stick skillet, heat some olive oil over medium high heat.  Cook shrimp for 1-2 minutes on each side until just opaque.  Remove from pan and set aside.  When cool enough to handle, slice each shrimp in half as you would to butterfly it, but slice all the way through. 

In the same skillet, heat a small amount of oil over medium high heat.  Add black beans, season with salt, pepper and chipotle in adobo puree, to taste.  Add several splashes of water (or chicken stock) and simmer beans until all the water has evaporated.  Taste and repeat process with water until desired texture is reached.  Remove beans from pan, set aside, and wipe out the skillet.

Build each quesadilla by smearing cream cheese on one side of the tortilla.  Spread some of the black bean mixture on top of that.  Layer the halved shrimp and sprinkle with Monterey Jack cheese.   Top with other tortilla and fry in a small amount of olive oil in the cleaned non-stick skillet.  Cut into wedges and serve with edamame guacamole. 

(Servings:  4, Prep time;  30 min., Cook time:  15 min., Difficulty:  Easy) 

Edamame Guacamole
adapted from Cara’s Cravings

1 cup frozen, shelled edamame

2 medium avocados

1 lime
salt

quarter of a small red onion, finely chopped

2 small tomatoes, chopped
1 bunch of cilantro, finely chopped

Place edamame in the microwave-safe bowl with a small amount of water and microwave for 5 minutes.  Remove and rinse with cold water until chilled.

Mash avocado with lime juice and salt.  Mix in the red onion, tomato, cilantro, and edamame. 


Printable Version


foodforscot Ratings:

Shanon (taste):  10/10
Scot (taste):  9/10
Effort: 2/5
Dishwashing Effort:  2/5

Monday, October 11, 2010

Shrimp Fried Rice


I did not set off the smoke alarm.  But, it totally should have gone off.  Maybe we should make sure they work.  :|

So, what happened.  Let me first tell you Steamy Kitchen's tips for great fried rice.

1.  use previously chilled leftover rice (totally key)
2.  use high heat (use water test explained in recipe)
3.  fry ingredients separately
4.  no touching!  just let it cook as the recipes says.


Obviously my smoke out was a problem with #2.  I think I went a little too hot.  As in, I heated up my wok for like 7 minutes (with the oil already in it).  I was right next to kitchen reviewing my recipe, killing time, when I looked up and massive plumes of smoke were shooting off my wok.  

Scot and I are really good at emergency smoke evacuations.  Turn on the fan.  Turn on all the fans.  Open all the windows and doors.  This one was pretty bad.  I mean the oil and/or something else that was in the wok just burnt black.  Borderline stop, drop and roll.  

After clearing out the smoke and scrubbing the wok clean.  Redo!  And it actually went very smoothly for round two.  My wok/stove combo only needs like a medium-high heat (pre-heated about 4 minutes in dry wok).  

This is a great, great recipe.  Jaden, from Steamy Kitchen, does a thorough job of explaining exactly what to do.  I love fried rice because it is the perfect way to use up leftover rice.    And because it is so fast to make (after you have the leftover rice).  And because it is an excellent way to practice smoke drills.  


Shrimp Fried Rice

8 ounces small uncooked shrimp, shelled and deveined
1/4 teaspoon salt (or 1/2 tsp kosher salt)
freshly ground black pepper
1/2 teaspoon cornstarch
2 tablespoons cooking oil (divided)
3 eggs, beaten in a small bowl
2 stalks scallion or green onion, minced
4 cups previously cooked leftover rice, grains separated well
3/4 cup frozen carrots and peas, defrosted
1 tablespoon soy sauce
1 teaspoon sesame oil

In a bowl, toss the shrimp with the salt, pepper and cornstarch. Let the shrimp marinate for 10 minutes at room temperature. Heat a wok or large sauté pan on high heat. When the pan is hot enough for a bead of water to instantly sizzle and evaporate, add only 1 tablespoon of the cooking oil and swirl to coat pan.

Now add the shrimp, quickly spreading out around the pan so that they are not overlapping. Let the shrimp fry, untouched for 30 seconds. Flip over and let the other side fry for 30 seconds, or until about 80% cooked through. Remove the shrimp from the pan onto a plate, leaving as much oil in the pan as possible.

Turn the heat to medium and let the pan heat up again. Pour in the eggs, stirring in a quick motion to break up and scramble the eggs. When the eggs are almost cooked through (they should still be slightly runny in the middle), dish out of the frying pan onto the same plate as the cooked shrimp.

Use a paper towel to wipe the same wok or sauté pan clean (no need to wash) and return to high heat with the remaining 1 tablespoon of cooking oil, swirling to coat. When the oil is very hot, add the green onions and stir fry until fragrant, about 15 seconds. Add in the rice and stir well to mix in the green onions throughout. Spread the rice all around the wok surface area and let the rice heat up, untouched until you hear the bottoms of the grains sizzle, about 1-2 minutes. Use the spatula to toss the rice, again spreading the rice out over the surface of wok or pan.

Drizzle the soy sauce all around the rice and toss. Add the peas and carrots, the cooked eggs, shrimp and sesame oil, tossing to mix the rice evenly with all of the ingredients. Let everything heat back up again, until the rice grains are so hot they practically dance! Taste and add an additional 1 teaspoon of soy sauce if needed.

(Servings: 4, Prep time: 15 min., Cook time: 15 min., Difficulty: Easy)


foodforscot Ratings:

Shanon (taste):  8/10
Scot (taste):  8/10
Effort:  2/5
Dishwashing Effort:  2/5

Thursday, July 22, 2010

Lemony Shrimp Scampi Pasta


This pasta is so light and delicious.  Sometimes I never order pasta when we go out to eat.  As in never.  Maybe it is because we eat it a lot at home.  Maybe it is because I always want something else more.  Regardless, my point is, I hate restaurant alfredo sauces/cream sauces.  Obviously, that is my point, right?

Seriously though, why?  Who invented alfredo?  I realize I have made cream sauces for pasta before.  And posted them on this website.  But, for some reason, the pasta dishes at restaurants just make me angry.  What makes me even more angry are low fat alfredo sauces.  Wow.  Deep breath.

That is why this pasta dish is such a breath of fresh air for me.  It feels good to eat.  It is garlicy, lemony with a small kick of spice.  A little butter.  Carefully cooked shrimp.  This is what a good pasta dish is for me (or any tomato based sauce).  Seriously, perfection.  I love Melissa D.


Lemony Shrimp Scampi Pasta
recipe by Melissa d’Arabian via Food Network

6 garlic cloves, pressed or grated
2 lemons, zested and juiced
5 tablespoons olive oil
1 teaspoon red pepper flakes
Kosher salt and freshly ground black pepper
3/4 pound medium shrimp (21 to 25), peeled, deveined and butterflied (reserve
shells)
1/4 onion
3/4 pound thin linguini
2 tablespoons butter
1 small bunch parsley, leaves chopped

In a bowl, combine the garlic, zest and juice of 1 lemon, olive oil, red pepper flakes, salt and pepper, to taste, and the shrimp. Set aside.

Meanwhile make a quick shrimp stock: In a small pot, over medium heat, add the shrimp shells and onion. Cover with water and bring to a boil. Reduce the heat and simmer for 20 minutes. Strain into a bowl and discard the shells and the onion.

Bring a large pot of water to a boil over high heat and add a generous amount of salt. Add the linguini and cook until just tender, 2 minutes less than instructed on the package. Drain and reserve 1/2 cup of cooking water.

Heat a skillet over high heat. Add the shrimp and cook until they turn pink and start to caramelize, about 3 minutes. Remove the shrimp from the pan to a plate and add the remaining marinade. Let cook a few minutes then add about 1 cup of shrimp stock and about 1/2 cup pasta water. Continue to cook until sauce reduces by half. Add the zest and juice of the remaining lemon, the butter and the parsley and stir to combine. Adjust seasoning with salt and pepper, to taste. Add in the shrimp and pasta and toss to combine with the sauce. Turn out into a serving bowl and serve immediately.

(Servings: 4, Prep time: 15 min., Cook time: 15 min., Difficulty: Easy)

Thursday, June 3, 2010

Roasted Corn and Poblano Polenta with Cumin and Chili Shrimp


I saw this recipe on a new blog that I recently found, elly says opa.  I knew right away that Scot would love this dish.  It has all his favorite things.  He loves Mexican flavors, especially the flavor of corn.  

The idea of transforming a normally Italian polenta dish into something Mexican is pure genius.  I mean, the corn flavor of polenta pairs so well with Mexican.  

I love freshly roasted peppers.  Even though I do use jarred roasted red peppers to speed up a week night meal...roasting them yourself is amazing.  I have never seen other varieties of jarred roasted peppers, so most of the time I have to roast them, anyways.  But they take on a whole new thang.  SO good.  In fact, I used two poblano peppers instead of one, as the original recipe suggested.

We had this polenta with cumin and chili shrimp, as Elly suggested.  Just season cleaned shrimp with salt, pepper, chili powder, and cumin.  Then, saute in a little oil over medium-high heat, 1-2 minutes per side. 

Lastly, the cheese is really optional.  I only added it because I already shredded it.  But, taste the polenta without it.  It is so creamy and delicious.  It doesn't need it at all.  


Roasted Corn & Poblano Polenta
adapted from elly says opa

2 poblano peppers
3/4 cup roasted corn (approximately 2 ears of fresh corn)
2 tsp. butter
1 clove garlic, grated
1-2/3 to 2 cups chicken broth (depending on how thick you want the polenta)
1/4 tsp. paprika
1/2 cup yellow cornmeal
1/4 cup (1 oz.) cheddar or Monterey jack cheese (optional)
salt and pepper

Preheat oven to 375° F. If using fresh, cut kernels off of ears of corn. Spread kernels in a single layer on a baking sheet. Roast for about 10 minutes.

Turn oven to broiler setting, char the poblano peppers on all sides, until the skin is blistery and black. Put in a bowl and cover with plastic wrap. Once cooled, peel and dice.

(Alternatively, you can roast the corn and the poblano peppers on the grill.)

Heat the butter in a small saucepan over medium heat. Add the garlic and stir until just fragrant. Stir in the chicken broth, paprika, and salt and pepper to taste; bring to a boil.

Slowly whisk in the polenta - it will absorb the liquid almost immediately. Add the diced poblano and corn. Reduce the heat to low and continue to simmer, stirring frequently, until cooked, about 10-15 minutes.

Off the heat, stir in the cheese and re-season if necessary. Serve immediately.

(Servings: 2, Prep time: 45 min., Cook time: 20 min., Difficulty: Easy)

Tuesday, April 13, 2010

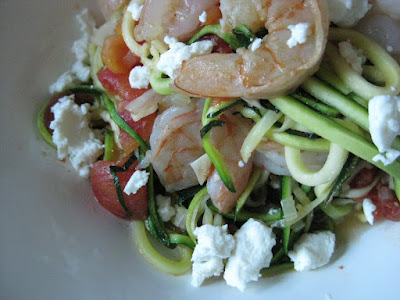
Zucchini Noodles with Shrimp and Goat Cheese


Cara! This was delicious! Scot and I absolutely loved it!!! I should probably talk to you on your own blog. I will.

This is majorly low carb (for me). In fact, Cara JUST posted this recipe. I knew I need to make it immediately, so obviously I did. But, I was also immediately concerned about the low carb-ness. For Scot. He really needs carbs. Otherwise, he gets crabby. And you know, the whole thing with him frantically searching the house for anything chocolate. So I just gave him a roll to sop up the juices with. It worked. For me, this was a perfectly balanced meal, as is.

And Scot really enjoyed it too.

It was pretty quick too. Except for deveining the dang shrimp. I devein both sides, and the store never has both sides deveined! Shoot!

And as for julienning the zucchini, I found two things worked. First, I tried the mandoline. Mine has two settings for julienning. It worked ok, but I couldn't use the safety guard and I was afraid for my life. Then, I tried my julienne peeler. Secretly forgot I even had it (partially because I didn't even mean to buy it, I wanted a regular peeler, but I like it now!!). It worked best and I thought the size of the noodles were perfect. Cara said she used a zester (not a microplane). Hers look really nice. Mine are various sizes and shapes, but I still loved how they tasted.

Zucchini Noodles with Shrimp & Goat Cheese

1 tsp olive oil
1 small onion, thinly sliced
2 cloves minced garlic
12 oz raw shrimp, thawed, peeled, deveined
freshly ground salt & pepper
14oz can diced tomatoes
pinch of crushed red pepper
1 tsp chopped fresh basil
400gm grated zucchini (from about 3-4 zucchini)
2 oz goat cheese

Heat the olive oil over medium heat in a large skillet. Add the onions and saute for about 5 minutes, until softened. Add the shrimp and garlic. Cook the shrimp for about 1 minute on each side, until just opaque. Remove the shrimp from the
pan. Add the tomatoes, crushed red pepper, and basil. Bring to a boil then reduce to a simmer and cook for about 5 minutes. Add the zucchini and saute over medium heat until slightly softened, about 3 minutes, then add the shrimp and heat through, about 1-2 minutes more. Serve with crumbled goat cheese.

(Servings: 2, Prep time: 15 min., Cook time: 15 min., Difficulty: Easy)

Sunday, March 28, 2010

Pot Stickers


This might be my new favorite recipe on the blog. Did you know that pot stickers were originally created by accident? The chef of some ancient king accidentally steamed dumplings for too long, all the water evaporated and the dumplings stuck to the pan. They got all crispy and the chef didn't have time to remake them, so he served them to the king, who loved them! Well, that is what I heard on Arthur once (yeah, the cartoon). It must be true. Wikipedia does not confirm this story.

Now, I am not Asian. However, I am pretty sure I should be. I NEED to travel Asia and eat all the food in every country. I try to experiment at home, but I think it is always best to eat dishes made by experts first. I finally found an Asian market here in Boulder. I loved every second of it. And inch. I went yesterday and got so much good stuff (not really for this meal, btw): kimchi, mochi, sriracha, new toasted sesame oil (mine was like 7 years old...), and tons of other stuff for some dishes I am making in the near future. And it was so cheap! Smelled weird in there. And the lady seemed to hate life. But she was helpful. I can't wait until I need something again soon so I can go back.


This meal was just delicious. I had Scot help me fill the pot stickers because this makes 36! See video below for a little demo.


This recipe is very detailed, so I don't know that I have any tips. Oh yeah, one thing, these are best if you let them cool maybe 5-8 minutes before eating them. Since they are steamed/boiled, they are wicked hot on the inside. If you wait, they are much easier to eat. I served with the best dipping sauce ever (recipe below), sticky white rice, and snow peas (quickly boiled and tossed with soy sauce, rice vinegar and sesame seeds).


Pot Stickers
adapted from Thy Tran’s recipe in Fine Cooking Magazine via Food People Want

2 cups finely chopped napa cabbage
Kosher salt
12 oz. ground pork
8 oz. peeled, deveined raw shrimp, coarsely chopped
3 medium scallions, thinly sliced
3 large cloves garlic, minced
2 tablespoons Shaoxing (Chinese rice wine) or dry sherry
1-1/2 tablespoons grated fresh ginger
1 tablespoon soy sauce
2 teaspoon toasted Asian sesame oil
1/2 teaspoon granulated sugar
Freshly ground black pepper
36 very thin, 3-inch circular, store-bought pot sticker or gyoza wrappers
2 tablespoons peanut or vegetable oil

Make the Filling: In a medium bowl, toss the cabbage with 2 teaspoons salt and set aside for 30 minutes to shed moisture. Wring out in a clean kitchen towel to extract as much liquid as possible.

In a large bowl, combine the cabbage with the pork, shrimp, scallions, garlic, Shaoxing, ginger, soy sauce, sesame oil, sugar, and 1/4 teaspoon pepper. Stir until well mixed. Refrigerate for at least 20 minutes.

Fill the Dumplings: Spoon 1 to 2 teaspoons of the filling onto a dough wrapper, fold it in half, and make your first pinch at the center of the curved edge and then pleat toward the center on both sides to create a rounded belly. This wider shape allows the dumplings to sit upright in the pan and form a flat surface for browning.

Repeat with the remaining wrappers and filling. As you work, arrange the filled dumplings in a single layer without touching on large plates, so they don’t stick together.

Pan-Fry the Dumplings: Heat 2 Tbs. vegetable oil in a heavy-duty 10- or 12-inch skillet over medium-high heat until shimmering. Working quickly and in batches if necessary (adding more oil for the second batch if needed), arrange the dumplings belly side down in concentric circles starting from the outer edge. Cook until golden brown on the bottom, 1 to 2 minutes.

Pour in about 1/2 cup water or enough to come about a third of the way up the sides of the dumplings, bring to a boil, cover, and cook until all of the water has been absorbed, 2 to 3 minutes. Remove the lid, reduce the heat to medium, and continue cooking just until the dumplings are dry and crisp on the bottom, 1 to 2 minutes. Loosen the dumplings from the pan with a spatula.

Invert the pan over a plate to flip the dumplings, browned side up, onto the plate (or transfer with a spatula). Serve immediately with your choice of dipping sauce (see recipe below).

(Servings: 36 dumplings, Prep time: 1.5 hrs., Cook time: 45 min., Difficulty: Intermediate)

Dipping Sauce

1/4 cup soy sauce
1/4 cup rice vinegar
2-3 tbsp of honey
1/4-1 tsp of crushed red pepper flakes

Mix everything together. Taste and adjust as needed.


And, for fun, here is a little demo of Scot cheffin' up some pot stickers:

Sunday, February 14, 2010

Shrimp Bisque


This was such a bisque to make. Kind of takes some time. Lots of steps and details. The texture is amazing though.


V-day dinner! Scot had a race on V-day, so we didn't get home until kind of late. I still tried to make dinner. I think we ended up eating at like 9 pm. It happens. Actually, it happens a lot to us.


We had this shrimp bisque, with caramelized onion crostini and a mixed citrus salad. I liked the meal because it was interesting. The bisque was pretty good. I didn't have (or want to buy) all the alcohol that is calls for, so for the most part I left it out. Except, I did include the white wine, since I always have that. I enjoyed the soup, but it did taste like white wine. I like most things with wine in them, but since I don't drink wine, I haven't acquired the taste for it. If you like wine, you will love this. I might try it again sometime using a recipe without the wine.


Don't overcook the shrimpies!


Shrimp Bisque

by Closet Cooking


1 pound shrimp (peeled, deveined, and roughly chopped, shells reserved)

1 tablespoon oil

1 tablespoon butter

1 cup onion (chopped)

1/2 cup carrots (chopped)

1/2 cup celery (chopped)

2 cloves garlic (chopped)

2 tablespoons flour

2 cups of stock (fish or chicken, I used dashi)

2 cups of water

2 cups of canned tomatoes with juice (chopped)

1/4 cup dry sherry

2 tablespoons brandy

1 sprig fresh thyme

1 bay leaf

1/4 cup arborio rice

2 tablespoons tomato paste

1 tablespoon paprika

1 tablespoon butter

2 tablespoons dry white wine

1/4 cup dry sherry

2 tablespoons brandy

2/3 cup heavy cream

salt and pepper to taste

1/2 lemon (juice)


Heat the oil and melt the butter in a large sauce pan. Add the onion, carrots and celery and saute until tender, about 10-15 minutes. Add the garlic and shrimp shells and cook for 2 minutes. Add the flour and stir it in for a minute. Add the

stock, water, tomatoes, sherry, brandy, thyme and bay leaf. Bring to a boil, reduce the heat and simmer, covered, for 30 minutes.


Strain the liquid into another sauce pan and discard the solids. Add the rice, tomato paste and paprika. Bring to a boil, reduce the heat and simmer, covered, until the rice is cooked, about 20-30 minutes.


Melt the butter in a pan. Add the shrimp and saute until just cooked, about 2-3 minutes per side. Add the wine and deglaze the pan.


Add half of the shrimp and the juices to the soup and puree until smooth. Add the remaining shrimp, sherry, brandy and cream and heat to serve. Season with salt, pepper and lemon juice.


(Servings: 4, Prep time: 30 min., Cook time: 1 hour, Difficulty: Easy)


Printable Version