Showing posts with label grill out. Show all posts

Saturday, August 10, 2013

Warm Grilled Eggplant Salad

Week 10 - Herbs (basil, chives), peaches, white plums, assorted cherry tomatoes, yellow tomato,  (none of that is part of our CSA), 4 tomatoes!, red potatoes, salad greens, Rosa Bianca eggplant, Asian eggplant, green peppers, hot peppers, yellow squash, zucchini, cucumbers, dandelion greens, corn, Swiss chard.
I lost my week 9 photo.  But it was good stuff.  Similar to week 10.  We are there.  The peak of summer produce.  The pinnacle of all that is good.  We are FEASTING!!!


Can you believe this?  Four of these babies came with our CSA.  I bought the rest.  I did an ok job controlling myself.  We had another 5 or 6 from our garden that we ate this week.  Plus several handfuls of cherry tomatoes to supplement.  I thought I might save some of our tomatoes for winter in some form, but I am not at a point yet where I feel overwhelmed by tomatoes.  I feel happy about tomatoes.  I want more!  


This salad was so delicious.  It is very simple.  Some grilled veggies, tossed with some salad greens and a lemon, herb vinaigrette.  I wanted to pair it with something with a bright flavor, acidic flavor, but I also thought something cheesy would be good.  I made some stuffed tomatoes.  Mine where just stuffed with goat cheese, a little panko bread crumbs, parm, basil, and chives.  I cut a very small hole in the top of each tomato (and then ate the hole), then stuffed the cheese filling in.  I baked for about 20 minutes at 400 degrees.  Might be better to just throw them on the grill to avoid the oven.  It has been cold and rainy here so it wasn't a big deal for us.  

We are equally obsessed with eggplant as we are with tomatoes.  Our eggplants in our garden are doing well.  We will probably have at least ten.  We have been getting three or so in our CSA each week.  So good.  These Rosa Bianca globe shaped eggplants are amazing.  Maybe I will make some Baba Ganoush to freeze for Birk once he is ready to explore non-milk calories.  I very much appreciate the milk-only diet.  Meal prep is pretty easy.  Wish we could ride out that phase a little longer.  
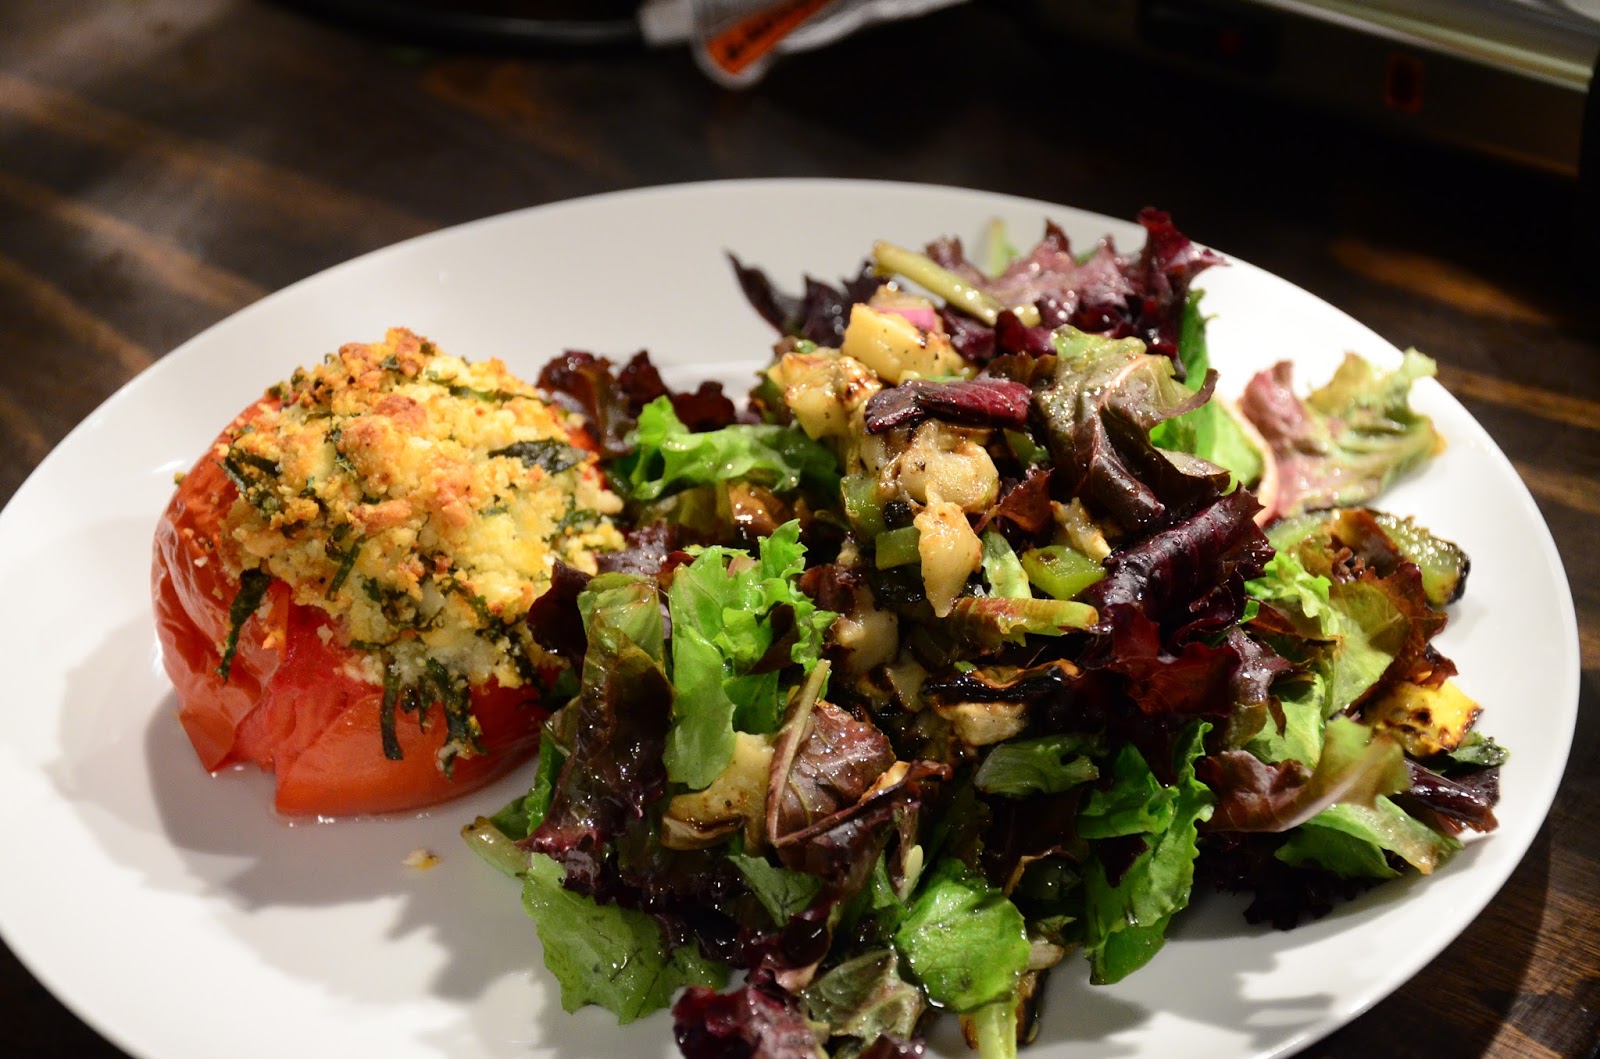

Warm Grilled Eggplant Salad
by foodforscot

1 eggplant (I used Rosa Bianca)
1 summer squash
1 green pepper
1 big bag of salad greens
quarter of a medium red onion, thinly sliced
1 handful of basil, rolled and thinly sliced
10 chives, minced
½ tsp of Dijon mustard
1 lemon, juice
1 tsp of red wine vinegar
olive oil
salt
pepper

Slice the eggplant to make 1/4th of an inch thick rounds. Place in a colander (or lay out on a kitchen towel) and sprinkle generously with salt. Mix (or turn) to evenly coat the eggplant with the salt. Let sit for at least 30 minute (up to an hour or so) to release the water out of the eggplant.

Prepare the dressing: In a medium bowl, combine basil, chives, Dijon mustard, lemon juice, red wine vinegar. Season with salt and pepper. While whisking, slowly add in olive oil. Add more salt, pepper, and oil, to taste. Set aside.

Preheat grill to medium high.

Slice the summer squash and quarter (and core and seed) the green pepper. Season with salt and pepper. Once eggplant is done, pat dry with a kitchen towel. Season with pepper. Drizzle olive oil over everything.

Right before grilling, turn off the flame, brush the grill with olive oil. Turn the flame back on. Grill eggplant, squash, and green peppers until soft with nice grill marks. Remove from grill and chop into bite sized pieces.

In a large bowl, toss together salad greens, red onions, grilled veggies, and lemon/herb dressing. Salad is best served warm and immediately.

(Servings: 3, Prep time: 30 min., Cook time: 30 min., Difficulty: Easy)

Printable Version

foodforscot Ratings:

Shanon (taste):  8/10
Scot (taste):  8/10
Effort:  2/5
Dishwashing Effort:  2/5

Sunday, July 28, 2013

Eggplant and Tomato Grilled Pizza


One of my favorite preparations of the most popular summer veggies (including:  cucumbers, zucchini, and eggplant) is to remove some of the moisture by salting them.  Salt seems to be a fear for many people.  It is one of the many unfortunate consequences of our wacky food system.  Salt is not only essential to give pretty much any ingredient flavor, but it is an amazing tool.

First, salt is fine.  Since many people are used to processed foods, convenience foods, and fast foods...salt has become this evil thing to avoid.  If you grew up eating packaged foods, you definitely didn't need to add salt to anything you were cooking.  When I would microwave my Hungry Man, I never pulled out the salt shaker to perfect the seasoning.  As a result, when cooking real food, I have talked to countless people who either skip the salt completely, or they feel very uncomfortable adding salt to their food.  Or they cringe watching me or someone else season a dish with salt.  The consequence of this fear of salt?  People think they hate "fill in the blank" ingredient.  Common culprits:  mushrooms, cauliflower, brussels sprouts, kale, beans, beets, squash, eggplant, and probably most veggies.

Now, there are lots of reasons people might not like a certain ingredient.  Most likely it is because the time they tried it, it was cooked poorly.  And it is very likely it wasn't seasoned properly.  Other options:  it wasn't in season, wasn't ripe, was mass produced and had no flavor, etc.  There is a small chance your palette isn't ready for that flavor yet.  Like why we don't feed babies bitter dark greens as their very first solid food.  It is hard to know exactly the reason why you might not like a particular ingredient, which is why you should always give ingredients a second chance (what I mean by that is..a 20th chance).

With the majority of veggies, whole grains, beans...you know all the healthy stuff...you need to season them.  With some salt. If I were to answer the question, is salt good for me?  My answer would be "yes!"  Aside from all the fancy nutritional explanations of why we need salt...sodium blah blah, electrolytes ya ok.  My reasoning is: it makes healthy food taste good.  Take a bitter vegetable of your choice:  kale, swiss chard, broccoli, brussels sprouts, whatever.  Roast it with and without salt.  Which one are you most likely going to go through the trouble of preparing and eating again?  The salted one!  More info on salt here.  The CDC, FDA, WHO all have articles on SODIUM.  Don't read those.  They assume you eat Hohos and McDonalds everyday.

Sorry.  I have watched two documentaries in the past two days on food.  One made me cry.  Like happy cry, but still.  Ok, I will tell you what made me cry:  "Fat, Sick, and Nearly Dead".  Phil stole my heart.

Back to this pizza.  What a perfect summer meal.  I made Pioneer Women's Tomato and Eggplant Pizza a few years ago.  That was my first time putting eggplant on pizza.  This recipe is very similar, but adapted for the middle of the summer.  A few summers ago I also posted on how to grill pizza.

I have made this twice in the past two weeks.  It is my favorite thing right now.  The toppings pair really well with the grilled, charred-ness of the pizza.


Eggplant and Tomato Grilled Pizza
by foodforscot

1 Japanese eggplant
1 bunch of kale, washed, stemmed and roughly chopped
half a pint of cherry tomatoes, halved
1 clove of garlic, minced
1 whole wheat pizza dough (room temp, mine is from a Brooklyn pizza restaurant)
fresh mozzarella (1 ball), thinly sliced
parmesan cheese, grated
olive oil
salt
pepper

Slice the eggplant to make 1/8th of an inch thick rounds. Place in a colander and sprinkle generously with salt. Mix to evenly coat the eggplant with the salt. Let sit for at least 30 minute (up to an hour or so) in the sink to release the water out of the eggplant.

In the meantime, prep the pizza toppings. In a skillet, sauté the kale in some olive oil. Season with salt and pepper and set aside. You can do all of this on the grill or inside on the stove. Next, lay the eggplant out on a kitchen towel. Pat dry (a lot of the salt should come off too). In a hot pan with olive oil or on the grill, sauté/grill each piece of eggplant until golden brown on each side. Do not season. Remove from pan and set aside. In the same skillet over medium high heat, add some olive oil and sauté the halved cherry tomatoes until soften and slightly charred. Remove from pan and set aside.

Preheat the grill to medium high heat. Divide the dough in half. You will want to make two small pizzas, instead of one large one. It is much easier to deal with small pizzas when grilling. I like to roll the dough out on parchment paper. Once the dough is rolled out, I pre cook it on the grill before topping it. Place the dough on the grill with the parchment paper still attached to the top. Then, peel the parchment paper off. Cook for a few minutes until dough is not raw. Flip and cook the other side a few minutes. Remove from the grill, place on a plate or cutting board. Turn heat down to medium low.

Top the pizzas (everything is divided evenly among the two pizzas). First, layer on the sliced mozzarella cheese. Sprinkle with minced garlic. Top with kale, eggplant, and tomatoes. Sprinkle with grated parmesan. Place back on the grill and cook for 5-10 more minutes until cheese is melty and crust is crispy. Watch the bottom of the crust, you don’t want to burn it!!!

(Servings: 3-4, Prep time: 1 hr., Cook time: 30 min., Difficulty: Intermediate)

Printable Version

foodforscot Ratings:

Shanon (taste):  10/10
Scot (taste):  9/10
Effort:  3/5
Dishwashing Effort:  2/5

Wednesday, July 6, 2011

Texas Caviar


I had never heard of Texas Cavier until a few months ago when TWO different friends brought it to TWO different potluck events.  Good story.  But the truth is:  this stuff is wicked good.

Might as well just call it black-eyed pea de gallo.  It is really your typical pico but with beans!  The Texas Caviar that is pictured here has some random additions that I just threw in to use stuff up (black beans and corn...and some tomato).  But, I have since made the exact recipe below and it is a wonderful combination.  In reality, you can throw whatever veg. you want in with the beans.  

I personally believe that black eyed peas are the most delicious bean out there.  Everywhere like such as.  I have recently discovered that I am a lover of white-ish beans.  Including but not limited to black eyed peas, cannellini beans, great northern beans, navy beans, and lima beans.  And edamame.  So, I guess I like green too.  I know you were all dying to know what my favorite beans were.  

PS:  This is also known as Cowboy Caviar.  I'd like to avoid conflict with Texas, so I will give this to them.  Oh yeah, and I don't care.   


Texas Caviar
adapted from Allrecipes

2 (15.8 ounce) cans black-eyed peas, drained and rinsed
1 cup diced jicama
2 fresh medium jalapenos, stemmed, seeded and minced
1/2 small red onion, cut into small dice
1 yellow bell pepper, stemmed, seeded and cut into small dice
1 red bell pepper, stemmed, seeded and cut into small dice
1 bunch cilantro, minced
6 tablespoons red wine vinegar or lime juice
6 tablespoons light cooking oil
1/2 teaspoon salt
1/2 teaspoon ground black pepper
1/2 teaspoon garlic powder (optional)
1 teaspoon dried oregano (optional)
1 1/2 teaspoons ground cumin (optional)

Mix all ingredients in a medium bowl; cover and refrigerate 2 hours or up to 2 days. Before serving, adjust seasonings to taste, adding extra vinegar, salt and pepper. Transfer to a serving bowl.

(Servings; 8-10, Prep time: 30 min., Difficulty: Easy)


foodforscot Ratings:

Shanon (taste):  8/10
Scot (taste):  8/10
Effort:  2/5
Dishwashing Effort:  1/5

Tuesday, March 8, 2011

Orzo Salad with Celery, Radishes, and Dill


When I first started cooking a lot, I made tons of pasta salad.  Not sure what it is about it, but me and pasta salad have always been like *that*.  They are great for an side dish that needs to be made in advance.  They are great for potlucks and as a grill out side.  


I was drawn to this recipe in bon appétit magazine because of three things:

1.  I have several (hundreds) boxes of orzo.  
2.  Our dill is...ready.  
3.  Goat cheese.

Ok, but I haven't had goat cheese in a loooong time.  And I need it in my life.  Why have I gone so long without it?  I must be delusional.  

I have a similar orzo salad that I posted last summer.  It is more of a mustard-dill dressing and has feta, tomatoes, green onions and cucumbers.  This new salad has a combination of dill, celery, radishes, tomatoes and goat cheese.  And the dressing is just oil and vinegar (white balsamic!)  Very tasty.  I love celery and radishes together.  And separate.  


Orzo Salad with Celery, Radishes, and Dill
from bon appétit Magazine, March 2011

2 cups orzo
1 1/2 cups very thinly sliced celery (about 3 stalks)
1 pint grape tomatoes, halved
1 bunch radishes, trimmed, thinly sliced
2/3 cup chopped fresh dill
5 tablespoon olive oil
4 tablespoon white balsamic vinegar
1 cup (about 5 ounces) crumbled soft fresh goat cheese

Cook orzo in large pot of boiling salted water until tender but still firm to bite, stirring occasionally. Drain. Rinse under cold water; drain. Transfer to large bowl; add celery, tomatoes, radishes, and dill.

Whisk oil and vinegar in small bowl. Season with salt and pepper and pour over salad; toss to coat. Season salad with salt and pepper. Fold in half of goat cheese.  Sprinkle remaining cheese over and serve.

(Servings: 8 sides, Prep time: 20 min., Cook time: 20 min., Difficulty: Easy)


foodforscot Ratings:  

Shanon (taste):  7/10
Scot (taste):  9/10
Effort:  2/5
Dishwashing Effort:  3/5

Sunday, August 15, 2010

Grilled Peach, Goat Cheese and Prosciutto Pizza


We had a little stay-cation over the past few days.  Scot’s bro and sis-in-law came to visit.  And, of course, our amazing little nephew came with.  We had a wonderful time.  We are totally in love with this little baby.  He has the cutest personality and is such a happy boy.  And guess what?  He is a great eater.  I think they have a potential foodie on their hands.  This is probably strongly related to all the wonderful homemade baby food his mom makes him.  J

Anyways, we had this pizza one night they were here.  I wanted to incorporate some Colorado peaches into a menu.  Colorado peaches are by far the best produce to come out of CO, for sure. 

This pizza is very clean and simple.  A combination of thinly sliced peaches, goat cheese and prosciutto.  You put that on anything and I will love it.  And I like to top these fruit pizzas with a lightly dressed salad.  I had a pizza similar to this at SALT in downtown Boulder for brunch a week or so ago.  They used blue cheese instead of goat cheese, which was also delicious.  But, as you know, I have an unhealthy obsession with goat cheese.  And I am totally ok with it.  


Grilled Peach, Goat Cheese and Prosciutto Pizza

1 pizza dough
1-2 peaches, peels and sliced thin
5 oz. of goat cheese, crumbled
3-5 slices or prosciutto
olive oil
salt and pepper
mixed greens
balsamic vinaigrette (recipe below)

Preheat grill to medium heat. Oil grates.

Divide dough into three equal pieces. Roll out each pizza to about 8 inches in diameter. The dough should be thin.

Precook each crust on the grill by cooking for 1-2 minutes on each side. Remove crusts from the grill and decrease heat to medium low. Top with peach slices, goat cheese and slices of prosciutto. Drizzle with olive oil and season with salt and pepper.

Place each pizza back on the grill, close the lid, and cook until crust is crispy and toppings are warmed through.

Toss mixed greens with balsamic vinaigrette. Top pizza with salad and serve!

(Servings: 3, Prep time: 15 min., Cook time: 15 min., Difficulty: Easy)

Balsamic Vinaigrette

1 tsp Dijon mustard
a splash of soy sauce
2 tbsp of balsamic vinegar
salt and pepper
3 tbsp olive oil

In the bottom of a big bowl, whisk together mustard, soy sauce, balsamic vinegar, salt and pepper. Continue to whisk, and as slowly as possible, stream in olive oil. By doing so slowly, this will emulsify the oil and vinegar (and then it won’t
separate).

Thursday, August 5, 2010

Toasted Israeli Couscous Salad with Grilled Summer Vegetables


This was a great side dish.  We had this with the grilled chicken stuffed with goat cheese with smoked chile-cilantro sauce that I posted yesterday.  

I have been wanting to try Israeli couscous for a long time.  It is much different regular couscous.  Almost more like orzo but spherically shaped.  It also cooks like pasta, not instant.  And I really like it.  It has a nice texture.  I would say it lends itself well to being paired with grilled veggies, especially if it is toasted first.  I am always looking for new sides to make when we grill out.  This is a great one.  


Toasted Israeli Couscous Salad with Grilled Summer Vegetables
by Bobby Flay via Food Network

1/2 cup balsamic vinegar
1 teaspoon Dijon mustard
2 cloves garlic, coarsely chopped
1 cup olive oil
Salt and freshly ground pepper
2 green zucchini, quartered lengthwise
2 yellow zucchini, quartered lengthwise
6 spears asparagus, trimmed
12 cherry tomatoes
1 red bell pepper, quartered and seeded
1 yellow bell pepper, quartered and seeded
1/4 cup basil chiffonade (stack leaves, roll in a cigar shape and cut crosswise into
thin strips)
1/4 cup coarsely chopped flat-leaf parsley
2 tablespoons olive oil
1 pound Israeli couscous
2 cups vegetable stock, heated
Hot water to cover

In a small bowl, whisk together the vinegar, mustard and garlic, slowly add the olive oil and whisk until combined. Season with salt and pepper. Pour 1/2 the marinade over the vegetables and let sit at room temperature for 15 minutes. Preheat the grill. Remove the vegetables from the marinade and grill the vegetables until just cooked through. Cut the zucchini and peppers into 1/2-inch pieces, cut the tomatoes in half. Heat the olive oil over medium-high heat, add the couscous and toast until lightly golden brown. Cover the couscous with the hot stock plus hot water and bring to a boil, cook until al dente and drain well. Place in a large serving bowl, add the grilled vegetables and herbs and toss with the remaining vinaigrette. Serve at room temperature.

(Servings: 8, Prep time: 30 min., Cook time: 20 min., Difficulty: Easy)

Wednesday, August 4, 2010

Grilled Chicken Breast Stuffed with Goat Cheese with Smoked Chile Cilantro Sauce


Bobby Flay is my favorite Food Network personality.  He is the only one I find natural and normal in front of the camera.  Scot does not agree with me.  His favorite is Sandra Lee.  

;)

Anyways, Bobby is great.  And we have reservations to go to Mesa Grill when we are in NYC.  CANNOT WAIT.

The only problem with Bobby is that he is a restaurant chef.  And rich.  So, he isn't exactly good at coming up with recipes for the everyday person.  However, a meal like this is good to make every once in a while.  Spice things up.  

This meal was delicious.  It is a chicken breast stuffed with goat cheese, roasted red pepper, olives and some fresh thyme.  The sauce is a lot of things including poblano peppers, cilantro and spinach.  All blended up in the blender.


If you have never stuffed a chicken breast, you were probably born after 1978.  Jk!  Didn't mean to slam B. Flay.  Or stuffed chicken breasts.  I just feel like they are kind of old school.  And I also feel like they are usually served at weddings.  But I don't know what I am talking about.  And who doesn't like a little surprise?

Anyways, to stuff one, you want to take the chicken breast and pound it out to about 1/4th of inch thick.  Then, put the stuffing on one half, fold over, and secure with toothpicks.  

And lastly, I did not smoke my poblanos because I don't have a smoker and also I don't even really know what that means exactly.  I am sure you could find smoked poblanos somewhere, but I didn't even try.  So, I roasted mine.  And I love poblano peppers.  They are pretty mild.  Like really mild.  But for some reason when I clean them my hands still burn.  

We ate this with a warm Israeli couscous and grilled veggie salad.  


PS:  Yes, I totally flagged my chicken breast with parsley.  I figured it couldn't hurt.  

Grilled Chicken Breast Stuffed with Goat Cheese with Smoked Chile Cilantro Sauce
by Bobby Flay via Food Network

8 ounces soft goat cheese
1/4 cup chopped nicoise olives
1 red pepper, roasted, peeled, seeded and chopped
1 tablespoon fresh finely chopped thyme
Salt and freshly ground pepper
4 large boneless chicken breast, pounded thin
2 tablespoons olive oil

Preheat grill. Mix together the goat cheese, olives, red pepper and thyme in a small bowl and season with salt and pepper to taste. Lay each breast out and fill with the cheese mixture. Brush the breasts with the olive oil and season with salt and pepper to taste, secure with toothpicks. Grill for 8 to 10 minutes or until golden brown and cooked through. Serving with smoked chile-cilantro sauce below.

Smoked Chile-Cilantro Sauce

2 poblanos, smoked, peeled and seeded
1/4 cup red onion, coarsely chopped
2 tablespoons fresh lime juice
3/4 cup olive oil
1/4 cup spinach leaves
1/4 cup cilantro leaves
2 teaspoons honey
Salt and freshly ground pepper

In a blender, combine the poblanos, onion and lime juice and blend until smooth. While the blender is running, add the oil slowly until emulsified. Add the spinach and cilantro and blend until smooth. Add the honey and season to taste with salt and pepper. Serve at room temperature.

(Servings: 4, Prep time: 1 hr., Cook time: 12 min., Difficulty: Intermediate)

Wednesday, July 28, 2010

PW's Favorite Burger (for now)


It has been burger mania up in here.  I know everyone has been saying it...but this summer has been the hottest summer I have experienced in a long time.  I don't ever remember having to use such extreme measures to avoid heating up the house.  The extreme measures being using the grill or not "cooking" food. 

And not wanting to use the dishwasher or dryer.  

And I have been taking cold showers so that the hot water doesn't heat up the house.  Or me.  

It is just weird.  Especially for Boulder.  

The good news is I have gotten to try out so many great burger recipes.  This one from Pioneer Woman is one that I have had saved for a long time.  Remember that magical red onion marmalade?  Well...it is just as amazing on top of a burger.  And with some blue cheese.  Delicious.  Pioneer Woman's recipe doesn't include the addition of balsamic vinegar, but I did add some.  Yum!  Try these for sure.  

PW’s Favorite Burger
by Pioneer Woman with modifications by foodforscot

1 pounds 80/20 Ground Beef
1/2 teaspoon Salt
1/4 teaspoons Black Pepper
Tabasco Sauce, To Taste
2 Tablespoons Butter
1 whole Red Onion, Sliced
2 Tablespoons Brown Sugar
1/8 cups Real Mayo
Kaiser Rolls
1/2 cup Crumbled Blue Cheese
Your Favorite Lettuce

Next, for the onions, heat a medium skillet over low heat. Add in 2 tablespoons butter. Dump in the sliced (not too thick, not too thin) red onions. Now add 2 generous tablespoons brown sugar. Give it a toss to combine the ingredients, and then allow the onions to caramelize over low heat for about twenty minutes, tossing occasionally.

While the onions are caramelizing, make the spicy mayo: Place mayonnaise into a small bowl and simply add a few dashes of Tabasco. Stir together and test for taste.

Place the ground beef into a medium mixing bowl. Add 1/2 teaspoon salt and 1/4 teaspoon of ground black pepper. Add a few dashes of Tabasco sauce. With your hands, mix the meat and seasoning well. Set aside.

Next, slice the Kaiser rolls in half and spread each half with about 1/2 tablespoon of butter. Place them face down on a grill pan or skillet over medium heat. Lightly grill the rolls so they’ll be tough enough to hold the spicy mayo. Let the rolls cool on a plate until you need them.

Form the meat into four patties and place on a grill pan or skillet over medium to medium-low heat. Allow each to cook about 3 minutes, then using a spatula, rotate 45 degrees, leaving it on the same side. Flip the burger and cook it for a couple of minutes, rotating it 45 degrees again to get the nice grill marks. Now add a large helping of caramelized onions over top of that glorious patty, followed by an equally generous helping of crumbled blue cheese.

As it finishes cooking, spread the spicy mayo on the Kaiser rolls and transfer the burger onto the bottom half of the bun. Top with a handful of greens and top with the bun.

(Servings: 4, Prep time: 10 min., Cook time: 25 min., Difficulty: Easy)

Tuesday, July 20, 2010

Turkey Burgers


We love these turkey burgers.  I can't believe I haven't gotten around to making them yet this summer!  

Ground turkey (or chicken) is one of those things that needs a lot love.  You can't just patty it up and throw it on the grill.  For any ground meat, but especially the lean stuff, I always add some fat, some veg, some spices and then throw in some bread crumbs and an egg, for good measure.  And well, for binding it all up.  

I would marry coriander if I could.  And cilantro.  I think I already told you this.  But, that plant is my food husband.

So...I forget where I was going with that.  I think I was just trying to tell you that these patties are graced by the presence of the plant in both forms.  With some celery and green onion, this makes for a very light and refreshing burger.  We almost always eat it topped with lettuce and pico de gallo, but this time I made a little avocado sauce.  It was one avocado, mashed up and I added the juice of one lemon, about 1-2 tbsp of sour cream, 1 tbsp of mayo, chopped cilantro and salt and pepper.  I thought it went well with the burger.  


Turkey Burgers

1 lb ground turkey
1/4 cup plain bread crumbs
1 egg
1-2 celery stalks, finely minced
2 green onions, finely minced
1 small handful of cilantro, chopped
2 tsp of coriander
1-2 tbsp of olive oil
salt and pepper

Mix all ingredients just until combined. Don’t overmix.

Divide into four portions and form four patties. Grill over medium high heat, about 5 minutes on each side, until fully cooked through.

Serve on bun with lettuce, tomato, red onion and sauce of choice. They are also great with pico de gallo.

(Servings: 4, Prep time: 10 min., Cook time: 10 min., Difficulty: Easy)

Monday, July 12, 2010

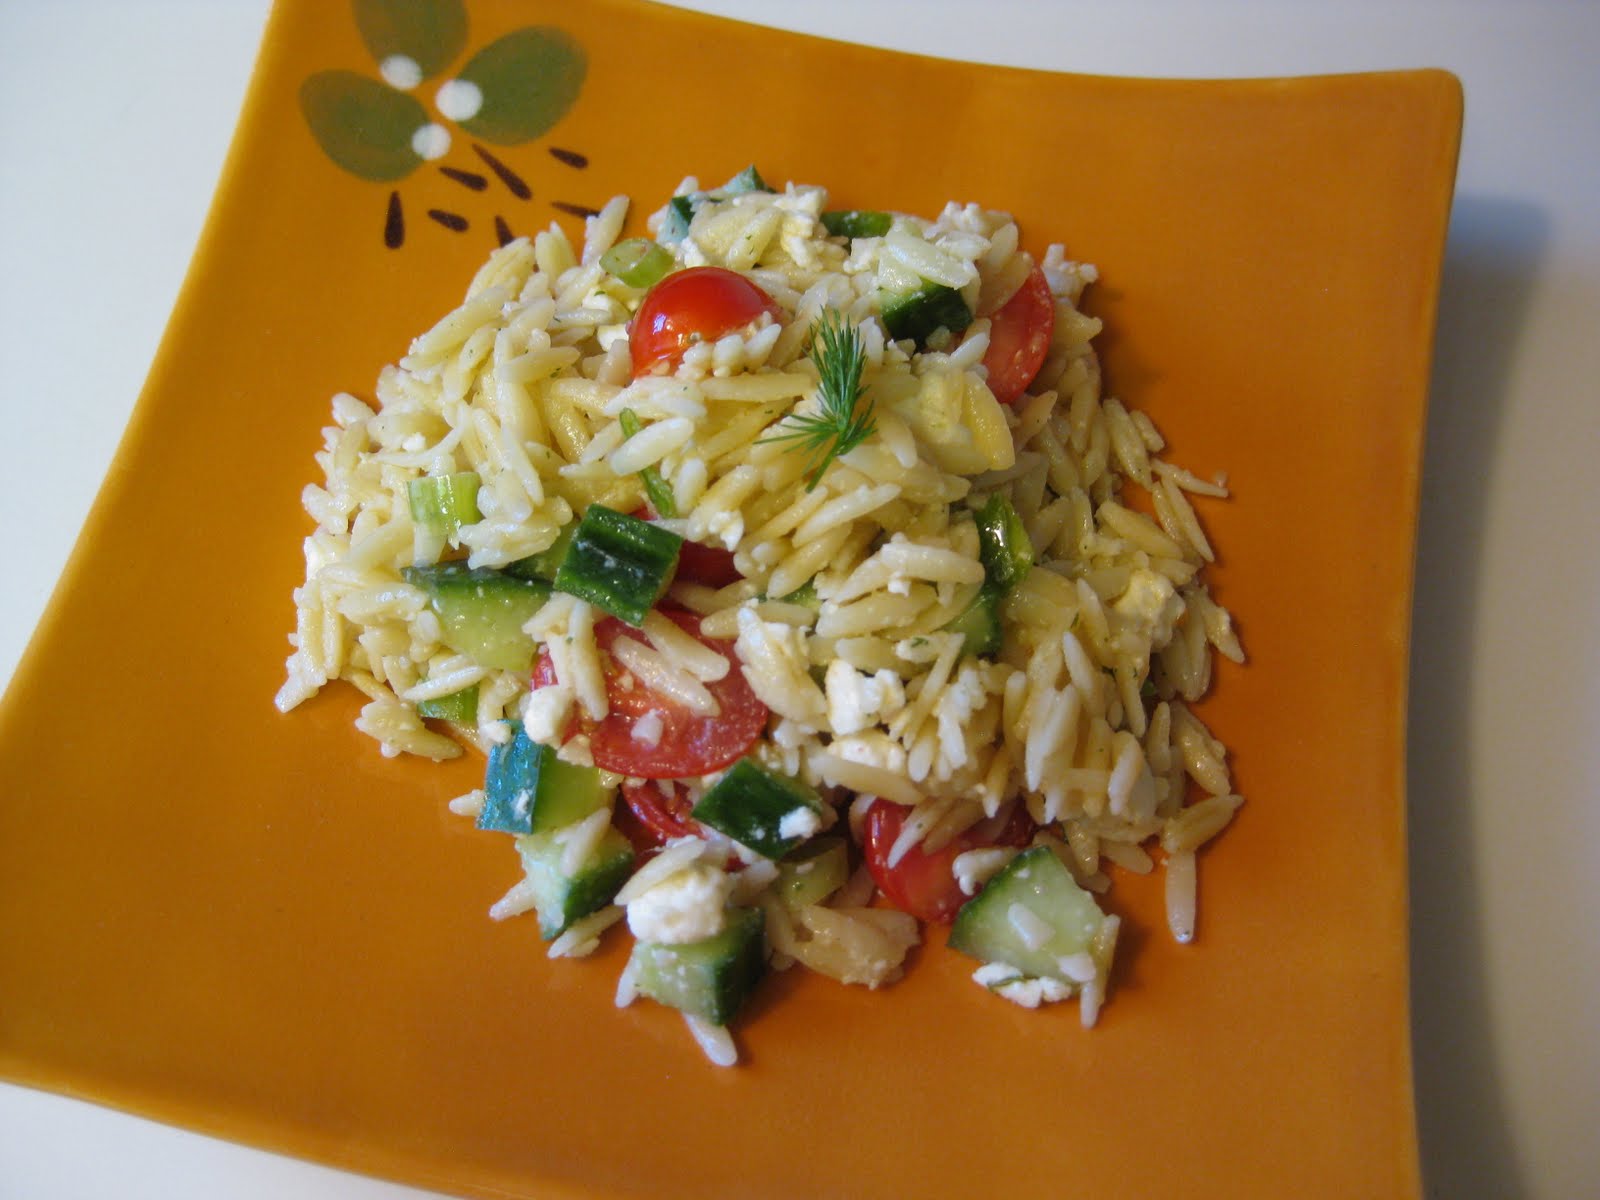
Greek Orzo Salad with Mustard-Dill Vinaigrette


I am always looking for new sides to bring to pot lucks or to make for grill outs.  Ya know...the ol' room temperature side.  

This recipe is for an orzo salad that I have made a few times before.  It is Greek-like because of the feta and dill dressing.  I love orzo.  And orzo salads are a nice change from your typical pasta salad (and there isn't anything wrong with a typical pasta salad...you might as well call me Mrs. PastaSaladPants).  


I actually prefer pasta salad served cold.  Fully chilled.  However, it tastes just fine room temperature if that is what you need.  

We had this orzo salad with some Boulder Sausage brats and cantaloupe.  Grill out and chill out.  


Greek Orzo Salad with Mustard-Dill Vinaigrette
by Bobby Flay via Food Network

3/4 pound orzo, cooked al dente
1 large cucumber, seeded, quartered lengthwise, and diced
3 green onions, thinly sliced
1 pint grape tomatoes, halved
1/4 cup chopped fresh dill, plus extra for garnish
1/4 cup white wine vinegar
3 tablespoons Dijon mustard
1/2 cup olive oil, plus additional for brushing shrimp
Salt and freshly ground pepper
3/4 pound feta cheese, crumbled

Combine orzo, cucumber, green onions, and tomatoes in a large bowl. Place dill, vinegar, and mustard in a blender and blend until smooth. With the motor running, slowly add the olive oil and blend until emulsified. Season with salt and pepper, to taste. Pour the vinaigrette over the orzo mixture and stir well to combine. Gently fold in the feta cheese.

(Servings: 6-8, Prep time: 30 min., Cook time: 10 min., Difficulty: Easy)

Wednesday, June 30, 2010

Korean Grilled Chicken


Have you been wanting to try some Korean recipes but have been too busy/scared/lazy to go buy all the crazy ingredients?  I feel ya.  This recipe is for you!

This recipe is for chicken marinated in a Korean marinade.  All of the ingredients for the marinade are at my grocery store (except for the Asian pear...I just use a regular one).  And besides the marinating time, it is pretty quick to throw it all together.  Yes!  Oh yeah, and this is a sweet marinade...doesn't have the usual Korean kick (has no chili oil or gochujang).  


You can just eat the skewered chicken, as is, with a few sides.  It would be great over some rice and with some grilled veggies.  You could also incorporate them into a lettuce wrap, taco or pita pocket.  You could top with kimchi, gochujang dressing, or any of the toppings for Korean tacos.  Or just make a little extra marinade and reduce that down for a sauce.  


We just had our with grilled veggies and potatoes (which I blanched).  Dinner on a stick!  


Dakkochi (Korean Skewered Chicken)

1 pound chicken breast (cut into bite sized pieces)
3 cloves garlic (grated)
1 inch ginger (grated)
1/2 small onion (grated)
1/2 Asian pear (grated)
1/4 cup soy sauce
1/2 tablespoon sesame oil
1 tablespoon brown sugar
1 green onions (chopped)
1/4 teaspoon pepper

Mix everything in a freezer bag and marinate for at least an hour.

Skewer the chicken on wet skewers and set aside.

Strain the solids from the marinade and simmer the marinade until it thickens and becomes saucy, about 5-10 minutes.

Grill the chicken until cooked, about 5 minutes per side basting it with the marinade as you go.

(Servings: 4, Prep time: 90 min., Cook time: 10 min., Difficulty: Easy)

Wednesday, June 23, 2010

Grilled Pizza!


We have become lovers of grilled pizza.  YUM!  Several people have recommend it to me.  And we finally gave it a shot.

Let me tell you about it:

1.  I am over heating up the oven to 500 degrees in our non-AC'ed apartment.  Dumb!  And hot!  Jk, I will probably still did it when I forget how much I hate it.

2.  Grilling pizza takes WAY less time than baking it.

3.  It tastes so good.  It gets nice char marks.  Blackened.

4.  After failing, we figured out a few good tips for doing it right.

First, you want to make smaller pizzas.  I would keep it to about an 8 inch diameter circle (or the equivalent for whatever shape you make).  Personal pan style.  Big pizza is hard to manhandle on the grill...flipping it and all that.

Next, how to grill it.  Oil the grill and over a medium heat, lay the rolled out dough (naked) over the flames.  Let it cook for about 1-2 minutes until it has nice marks.  Flip the dough over and cook until the raw dough hardens up slightly (about 1 minute).  You just want it to not be sticky anymore so you can easily slide it on and off a plate.  Take crust off the grill.

Now, top the crust with whatever you like.  Everything should be pre-cooked, since it will just be warmed up.  Then, slide the complete pizza back on the grill, close the lid, and cook until everything is melted and the crust is cooked through (about 5 minutes).  You may want to turn down the heat so the toppings have enough time to heat up before the crust is done.

We tried these two pizzas:


Shaved Asparagus Pizza.  This was our first shot and where we learned what not to do.  The shaved asparagus topping was delicious.  Really good with the two cheeses, fresh mozzarella and parmesan.  It was such a nice summer pizza.


Red Onion Marmalade Pizza.  This red onion marmalade is worth my life in coins.  I could just eat it as is.  Favorite!  Favorite!  The salty prosciutto and creamy ricotta cheese add nice balance to the sweet marmalade.  The onions are so good, it really doesn't matter what else is on here.  I think the prosciutto is totally optional.  And other cheeses would be great.  Goat cheese.  Mozzarella.  Something really creamy.  Or if you leave off the prosciutto, maybe add a salty cheese like feta or some parm.  I am going to play around with it.

Thursday, April 15, 2010

Jamie Oliver's Pasta Salad


Ok, so what I love about this pasta salad, is that everything it chopped up into tiny bits. It is like textural thing. Does it take like half an hour to chop everything into tiny pieces? Yes. Even with my exquisite knife skillz (kidding). You could potentially just throw it in the food processor, but I just can't be that cruel to cherry tomatoes. Bottom line, I love when an otherwise normal/typical thing can be changed up so much by simply doing a fine dice.

More importantly, please check out these chicks:

Our friends have chickens. It is amazing. Aren't they so cute?

I kind of really want chickens now. They are going to have fresh eggs whenever they want. It might be the best idea ever.

Jamie Oliver’s Pasta Salad
from Happy Days with the Naked Chef

11 oz. small shell-shaped pasta
3 cloves garlic
1 pint red/yellow cherry tomatoes (or a mixture of both)
1 handful of black olives, pitted
2 tbsp fresh chives
1 handful of fresh basil
1/2 a cucumber
4 tbsp white wine vinegar
7 table spoons extra virgin olive oil
sea salt
freshly ground black pepper

Bring a large pan of salted water to the boil. Throw in the pasta and cloves of garlic, boil until al dente, drain and run under cold water to cool. Put the garlic to one side to use for the dressing. Put the pasta into a bowl. Chop the tomatoes, olives, chives, basil and cucumber into pieces about half the size of the pasta and add to the bowl. Squash the garlic cloves out of their skins and mush in a mortar and pestle. Add the vinegar, oil and seasoning. Drizzle this over the salad, adding a little more seasoning to taste.

(Servings: 4, Prep time: 30 min., Cook time: 10 min., Difficulty: Easy)