Saturday, December 30, 2017

Wheel Pasta with Parmesan Bechamel


Birk is at an age now where it is fun for him to look forward to meal.  And I get a kick out of making him meals that he really loves.  He has been brainwashed and trained to just eat whatever is served (and, obviously, bribed).  This is a favorite pasta from the archives that I have made many times.  But I have played around with the recipe enough that I thought I'd re-post it.  Birk has never thought twice about it...until I made with pasta wheels.  Now, he has been requesting it.  Here is my original post and look at this oldie:


This pasta has a creamy-Parmesan sauce.  I am not a huge fan of dairy based sauces because they make me feel sad.  This sauce has a healthy amount of butter for the roux, but the bulk of the sauce is made with a stock and almond milk.  Since all the flavor comes from the Parmesan, the dairy base is not missed.  Technically this is more of a gravy than a Bechamel, but we will all survive with this lie.

I think the smoked salmon is essential for me.  It is basically equivalent to the flavor profile of mac and cheese with hot dogs.  Unfortunately, it can't be made as easily with pantry staples or on a whim, unless smoked salmon is a pantry staple for you.  If that is the case, good for you.  But otherwise, the rest of the ingredients are easy to keep stocked. 

Birk has so far opted out of the balsamic drizzle, but I personally love the tang it brings. 

Lastly, I know my photography skills are making you very envious.  That partially eaten bowl of pasta in low lighting...it is just beautiful. 

Wheel Pasta with Parmesan Bechamel 
by foodforscot

2 large carrots, peeled and diced (~1 cup)
1 cup of frozen peas
3 tablespoons of butter
3 tablespoons of flour
2 cups stock (chicken or veggie)
1 or 2 garlic clove(s), smashed
1 cup almond milk (or whatever you want)
2/3 cup grated Parmesan, plus more for sprinkling on top
2/3 lb of wheel pastas (or any short cut, shells would be good)
4 oz. of smoked salmon
(optional) drizzle of balsamic vinegar reduction

Fill a large saucepan (or pasta pot) with enough water to cook the pasta and bring to boil.  While water is coming to boil, continue on with the rest of recipe.  Once it comes to a boil, add pasta and salt and cook it until it is done.  Drain and set aside until the rest of the sauce is done.  But likely the sauce will be done first, waiting for the pasta.  

Place the peas and carrots in a microwave safe bowl and microwave covered for 4 minutes on high, or until carrots are soft.  I use a regular soup bowl and cover with side plate.  If you avoid microwave use to prolong your life, you may steam the veggies some other way (perhaps with your pasta).  The frost on the frozen peas is what makes the microwave method work.

In another saucepan, add the butter and flour.  Cook and stir to make a paste (called a roux, if I want to be a jerk about it).  Cook for a few minutes, this will cook away the raw flour taste.  Add the stock and garlic, bring to gentle boil.  Whisk stock and roux somewhat continuously to avoid any burning on the bottom.  After a few minutes of light boiling, the sauce should thicken.  At this point, add the Parmesan and almond milk and cook for another 5 minutes until Parmesan is melted in and milk is incorporated.  You can remove the garlic, or leave it in for a special surprise.

Once the pasta and veggies are cooked (and pasta is drained), add to the sauce.  Mix to combine.  To serve:  place pasta in bowl, top with a portion of smoked salmon and sprinkle with Parmesan.  You can also drizzle on some balsamic reduction, if you want to be fancy about it. 

(Prep time: 0, Cook time: 30 min., Difficulty: Easy)

Subs:
-You can use 2 cups of frozen carrot/pea mixture instead of fresh carrots plus frozen peas.  You might not need to microwave as long, but I trust you can figure it out.
-You can replace all the stock with milk, if that is what you have. 
-You can replace the salmon with other smoked meat, like hot dogs.  But don't tell anyone about it. 
-You can make your own balsamic reduction.  Put about 1 cup of balsamic vinegar in a sauce pan.  Bring to boil.  Boil until it reaches a syrupy consistency.  Or just buy it.  They sell it right by the balsamic vinegar at places like Whole Foods. 

Monday, September 18, 2017

No-Bake Energy Balls


I was reading something recently that it is important that we let kids experience boredom.  I also went to Paula Poundstone's show a month or so ago, and she also emphasized the importance of this.  I think adults need to experience boredom more too.  Some of us get into the habit of putting on our headphones and listening to a podcast or music while doing every task imaginable.  I have been known to listen to podcasts while reading Birk the same book I have read to him 100 times.  While its ok to do (not the book reading thing, that is ridiculous), I have my best ideas and thoughts when I just let myself think.  There are plenty of times while commuting (even in the car), that I just let there be silence.  That way, I can experience my thoughts.

For example, how much do you think about flip-flops?  I think about them a lot because I really do not like to wear them.  Some people work all day, waiting for that moment when they get home and they can put on their flops.  Others go about their lives dreaming of the job that allows them to wear flip flops.  Me...I find flip flops incredibly invasive but also too exposing.  To be honest, I can barely handle opened toed shoes.  As I am walking through the streets with my toes exposed, I feel as though all I am doing is putting my feet through an awful lot.  They are getting dirtier, drier, older, sun burnt, calloused.  It just seems as though shoes were designed so that we didn't have to expose our feet to such things.  I can't imagine a situation where I need them and I can't just be barefooted instead?

However, the other thing that I have been thinking about regarding flip flops is that I truly believe there is a positive correlation between people who like flip flops and how much fun a person is.  Story checks out for me.  I am definitely the least fun person I know.  And all my friends, who love flip flops, are way fun.  No way those commas are placed correctly.  See how fun I am!  The question is:  what is wrong with me?  Why can't I be more fun?

You have heard of these energy balls, right?  There are so many versions of these, so I thought I would post mine.  You may think they are for Birk, and they are, but they are more for Scot.  I have made these 4 times so far, and I think I have only ever consumed two balls.  I rarely have an appetite or taste for foods this dense.  Surely this is tied to my love for sitting.  Big fan of sitting.  But I am definitely in the minority, most people really love this kind of thing.


I have really liked having these around because they are so quick.  Birk is endlessly hungry these days.  Scot LOVES these.  This snack is Scot in ball form.  I strongly recommend mini chocolate chips, because the regular sized chips make it difficult to form a ball.  If you look below, I made batch of these with full size m&m's and peanuts, and they were harder to keep together.  I really like the "Enjoy Life" mini chocolate chip brand.  I feel like these need peanut butter (for both flavor and texture), as opposed to a nut butter substitute but I have not experimented.  I would recommend a fairly creamy version, for example, something like Justin's would be too dry.  However, you could probably make it work by adding more honey.

You will find a lot of versions of these if you google "energy balls".  Many include chia seeds and flax seeds, which would be a fine addition.  Many include vanilla extract, which you CANNOT taste the difference in peanut butter recipes of this nature, so I don't use it anymore.  


PS:  I hardly ever share such deep posts about myself here.  But if you have been reading these posts for a while, you now have to great gift ideas for me:  flip flops and edible arrangements.

No-Bake Energy balls
by everyone on the internet

2 cups oats
1 cup unsweetened shredded coconut
~3/4 cup creamy peanut butter
~1/2 cup honey
1/2 cup mini chocolate chips

Combine all ingredients except chocolate chips in a bowl (I find that a rubber spatula works best).  Don't measure "~" quantities (just eyeball it) because who wants to measure honey or peanut butter?  Might need to adjust quantities, depending on humidity.  Add more oats if too sticky, add more honey/peanut butter if too dry.

When mixture is at a consistency that allows you form a ball, add the chocolate chips and mix to combine.  Roll into balls.  This makes about 15 balls that are approximately 2-3 Tablespoons big.  But it doesn't matter.  Just make them however big you want.  If you are having trouble rolling them, you can also refrigerate for a half hour and roll after.

Keep refrigerated (tastes better cold anyway).

Sunday, July 9, 2017

Baked Pinto Bean and Swiss Chard Burritos (ATK)


This is one of our favorite dinners.  foodforscot 2015 and prior contained food for scot.  Meaning, I primarily cooked all the recipes.  Because recipes made by scot never made the blog.  I mean, I could show you how to make a bowl of cereal, but I just didn't.

Boy, has he come a long way.  Mostly because children need to eat food frequently and regularly, so waiting until mom** comes home and eating at 9 pm is no longer a viable option.  But these burritos are in Scot's repertoire.  And even better, Birk loves them.  I LOVE when Birk loves food that has more than 2 ingredients in combination.

These are filled primarily with rice, Swiss chard, and pinto beans.  The Swiss chard is stewed in a tomato sauce, which makes it super tender and sweet.  Out of all the greens, Swiss chard is not too bitter to begin with, but it is as mild as spinach in this preparation (I know, I should rewrite this sentence...it is the worst).  The filling is, most importantly, flavorful with specific and well tested measurements of spices and salt, which is Scot's favorite kind of recipe.


We also love that the burritos are "baked".  Everything inside the burrito is fully cooked and ready to eat, but after assembling, you sprinkle with a little cheese (these have more than I prefer, but I am not picky if someone is cooking dinner for me).  Then, you place under the broiler for only a few minutes to get the tortilla and cheese golden brown.  And you never leave that broiler's side.  In fact, keep the door open and just sit and watch.  The window of when broiling transitions from perfect to burnt is nearly 0.5 seconds.  

Lastly, we like to eat with some guacamole.  My current recipe for guacamole these days is mashed very smooth and seasoned with salt, lime, and garlic powder.  Recently I was preparing some avocado toast and was stuck with a pretty bad, green tasting avocado (although texture was fine).  I added some plain yogurt and it actually sort of fixed it.  Finally, I like to shake on some green Tabasco on every bite.  

Oh actually more.  Birk did not love these the first five-ish times he ate them.  I just wanted to make that clear.  After enough "experience" with this meal, he will even eat these at room temperature in his lunch box.  And they are great reheated too.  I have to stop writing about these burritos because my enthusiasm is starting to make me uncomfortable.  They are burritos.  You get it.  

Baked Pinto Bean and Swiss Chard Burritos
recipe from "The Complete Vegetarian Cookbook", America's Test Kitchen*

2¼ cups vegetable broth, divided
¾ cup brown rice, rinsed
6 cloves garlic, minced, divided
1 teaspoon kosher salt
¼ cup minced fresh cilantro
1 tablespoon vegetable oil
1 onion, finely chopped
3 tablespoons tomato paste
1 teaspoon minced chipotle chile in adobo sauce
1 tablespoon ground cumin
1 teaspoon dried oregano
1 lb. Swiss chard, stemmed and sliced into 1-inch wide strips
1½ cups cooked pinto beans (1 15 oz. can), rinsed, divided
1 tablespoon lime juice
6-7 10-inch flour tortillas
10 oz. Monterey jack cheese, shredded (about 2½ cups), divided

In a small saucepan over medium-high heat, combine 1¼ cups of the broth, the rice, half of the garlic, and ½ teaspoon of the salt. Bring to a boil. Cover, reduce the heat to low and cook until the rice is tender and the broth has been absorbed, about 45 minutes. Remove from the heat and let sit, covered, for 10 minutes. Add the cilantro and fluff with a fork to incorporate. Cover to keep warm.

Meanwhile, in a Dutch oven, heat the oil over medium heat until shimmering. Add onion and cook until just beginning to brown, about 5 minutes. Stir in the tomato paste, chipotle, cumin, oregano, remaining garlic, and the remaining ½ teaspoon of salt. Cook until fragrant, about 1 minute. Add the chard and ½ cup of the broth, cover and simmer until the chard is tender, about 15 minutes.

Using a potato masher or a fork, coarsely mash half of the beans with the remaining ½ cup of broth in a bowl, then stir into the pot. Cook, stirring constantly, until the liquid is nearly evaporated, about 3 minutes. Off the heat, stir in the lime juice and remaining whole beans. Cover to keep warm.

Adjust an oven rack to 6 inches underneath the broiler element and heat the broiler. Wrap tortillas in a damp dish towel and microwave until warm and pliable, about 1 minute. Lay warm tortillas on a work surface. Mound warm rice, chard-bean mixture and 1½ cups of the cheese in the center of the tortillas, close to the bottom edge. Working with 1 tortilla at a time, fold the sides of the tortilla over the filling, then fold up the bottom of the tortilla, pulling back on it firmly to tightly wrap around the filling and into a burrito.

Place the burritos seam side down on a foil-lined baking sheet. Sprinkle the remaining 1 cup of cheese over the top. Broil until the cheese is melted and starting to brown, 3-5 minutes. Serve warm with guacamole.

 *I copied the text of this recipe from (http://thehouseofnashrecipes.blogspot.com/2015/04/baked-pinto-bean-and-swiss-chard.html) because I didn't want to type it out myself but I just use the cookbook!  It is definitely the best cookbook I have ever owned.  
**Just curious your thoughts on me referring to myself in the third person, as mom?  It is a little uncomfortable but you like it, right?


Friday, June 16, 2017

Tuna Onigiri


I am a huge fan of Japanese cuisine.  Sushi, obviously.  But I find it to be such a comforting food culture.  We got to take a trip to Kyoto two winters ago and it is BY FAR my favorite place I have traveled.  NYC would be a close second.  The people were so welcoming.  The three of us idiots knew no Japanese and were very ill-prepared, but never felt like we were a nuisance or unwelcome.  But the food.  The food was everything I want.  Kyoto is particularly known for tofu and vegetarian dishes, but you can find all the typical Japanese food that tourists are looking for like sushi, ramen, soba, tempura, etc.

What I found so fun is eating at convenience stores and grocery stores.  Here is some stuff we got from a grocery store:


Those maki rolls have WAY too much rice (as I write about a recipe that is literally a ball of rice), but I will forgive them this time.  The rest was super good and very affordable.  That box of assorted sushi was less than $5.  On the far left, that is Inari sushi.  It is sushi rice wrapped in this thin piece of tofu that is coated in a sweet glaze.  Birk's fave.    

One of my favorite convenience store/grocery store snacks is the Onigiri.  In the picture below, you can see the 3 Onigiri triangles in the top right corner.  The only trouble we had was that there were so many different types of fillings and our phone translators didn't do a good job telling us what they were!  Surprise every time. 


So what is Onigiri?  It is a triangle ball of rice, filled with fish or veggies, and wrapped in nori.  The rice is typically not seasoned like sushi rice, but could be.  A very friendly filling is a tuna salad, so that is what the recipe below has in it.  It seems so simple, but what does it for me is the crunchy nori.  

You can make these two ways.  The first way is above, using a fancy wrapper (which you can buy here).  The wrapper prevents the rice from touching the nori, which is what makes it crunchy.  These Onigiri are available everywhere in Japan and I have also seen them in big cities like San Francisco and NYC.  They are such a great snack.  I loved them for breakfast.  The second way is in the photo below, just wrapping a normal piece of nori around the rice ball.  The nori will remain crunchy if you eat it right away or if you keep the nori separate from the rice ball until ready to eat.  Or if you want the same texture as sushi (soft nori), you can wrap in advance.

The fun of Onigiri for me is unwrapping it.  Genius packaging!  Here is a video of me unwrapping and eating it.   Trigger warning:  1. horrible video; 2. horrible audio; 3. sort of weird, right?


I like to eat with a little soy sauce, as shown in the video.  Other typical fillings include flaked, cooked salmon or a preserved plum.  I honestly wish I didn't have to make these and could just buy for $1 anywhere, as is the case in Japan.  But they are so satisfying that I will continue to make them until I move to Japan.  


PS:  I know my photography skills are problematic!  I will work on it.  I swear I will not hold every thing I make up to our window and take a back lit photo.  Did you hear the videos? 

Onigiri (filled with Tuna)
by foodforscot

3 cups of cooked sushi/short grain white rice (~1.5 uncooked)
3 full sheets of nori roasted seaweed, cut into thirds (or ~7-9 seaweed wrappers, here)
1 can of tuna, liquid drained
2 tbsp of mayo
2 tbsp of chopped pickles
1/4 tsp of garlic powder
salt and pepper to taste
1 tbsp-1/4 cup of sesame seeds

Prep your rice:  If you need directions on how to cook steamed rice without a rice cooker, see this recipe.  I would recommend that you use a rice cooker because it will always do it better than you.  I have this Cuisinart model and it has horrible reviews because if you make more than 2 cups, it overflows and makes a pretty big mess.  However, it STILL makes better rice than me so I have been using it for almost 10 years.  How am I old enough to EVEN say that.  This is how you write recipes, right?

Prep your filling:  mix together tuna, mayo, pickles, and garlic powder.  Use a fork to mash up tuna so there are not big chunks.  Season with lots of pepper, and salt to taste.

Prep your nori:  if you are using regular nori sheets, cut each sheet into three pieces.  If you are using the wrappers to allow you store and eat later, get all the annoying stickers ready. 

Assemble!

Use a mold (here):  rub your surface with water and sprinkle with a little salt.  Place mold on top.  Place cooked rice to fill half the triangle mold and press to compress.  Add a few spoonfuls of tuna mixture.  Fill the rest of the mold with rice and press to compress.  Sprinkle or roll is sesame seeds, and wrap in nori or wrapper.

Here is a video that shows what I just wrote (your choice if you want to be soothed by the audio):


Without a mold:  Rub your hands with a little water.  Sprinkle salt on hands rub together.  Grab about <1/4 cup of cooked rice.  Using a cupping motion with both hands, form ball.  Make a small indentation in the middle and fill with a spoonful of tuna mixture.  Redip your hands in a bit of water and add another <1/4 cup of rice to cover the tuna mixture.  The amount of rice doesn't need to be exact.  1/3-1/2 cups of rice per Onigiri seems reasonable.  Those numbers seem off based on the video.  Continue to mold using a cupping motion with your hands.  Once ball is formed, you can form into a triangle.  Just watch the video this is impossible to explain.  Sprinkle or roll is sesame seeds, and wrap in nori or wrapper.

Here is a video that shows what I just wrote (one of the creepier things I have done, also audio is optional and probably should be avoided):

Sunday, June 11, 2017

Healthy School Treats


Yikes.  A lot of life happened.   Super cute that my last post was "How I fed my baby during his first year".  Baby is now in preschool and I am still nearly as anxious that I am going to destroy him by feeding him the wrong food.  Something I am well aware I am worrying too much about but we all need something to spend our time on.

I have wanted to make it back to writing and sharing recipes so many times.  In fact, I have drafted many posts and later deleted them.  So, I figured, let's start with baby steps.  Healthy School Treats.

Birk just finished his third year of "preschool".  And guess how many schools hes been at?  Four.  Oh, man.  And, I have been so lucky to find schools with good, healthy food policies.  Amazing teachers.  I have loved his schools SO much.  However, the thing I still can't get on board with is school treats.  There are holidays, celebrations, and 75 birthdays each semester, and they so often bring with them a hugely celebratory treat.  I am ok with Birk celebrating a relevant occasion with dessert, but I just don't think that needs to happen at school.  It seems that there is one per week!

However, instead of being a party pooper, I thought that I could at least come up with some healthy school treats.  I have sent these three different treats to school with great success.  And these were tested on a group of 3-6 year olds who are used to getting real treats for other birthdays and holidays.  The three are:

1.  Berries - strawberries, raspberries, and blueberries.  The kids liked them so much, they requested the leftovers for their second snack.  Seems simple, maybe a little expensive for some, but a huge hit.

2.  Frozen yogurt covered banana - these were super popular.  The teachers said the kids had so much fun eating these.  See recipe below and photo above.

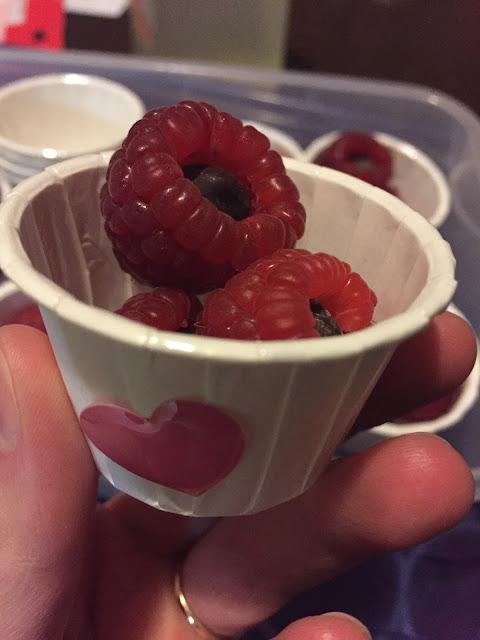
3.  Raspberries with a dark chocolate chip inside.  I got this idea from Annie's Eats, as she puts these as a treat in her kid's lunch boxes sometimes.  I sent these for valentine's day in a tiny paper cup.  A serving was 3, because raspberries are very expensive.  But sometimes when a treat arrives in a small portion, it tastes so much better.  The kids also loved these.  See photo below!

Next time, I will return with adult human food. 


Frozen Yogurt Covered Bananas
makes 3 pops (math for more)

1 banana (make sure they are ripe!  not green but not mushy yet.  )
1 cup of whole milk yogurt
1-2 tbsp of honey
sprinkles (I like these)
3 Popsicle sticks

Cut the banana into three equal pieces.  Insert a popsicle stick into each piece and set on a baking sheet lined with parchment paper.  Make sure the baking sheet can fit in your freezer!

Whisk together yogurt and honey in a bowl or a cup suitable for dipping.  Taste and adjust sweetness to your liking (doesn't need to be very sweet, though, because bananas are so sweet).  Dip each banana on a stick into the yogurt mixture and return to baking sheet.  Once finished dipping, sprinkle with sprinkles.

Place in freezer uncovered overnight or until completely frozen.  Once they are completely hardened, you can put them in a freezer safe bag until you are ready to deliver to school.  They can all be placed in a gallon size bag together, they do not stick for me (as long as they aren't allowed to melt and refreeze!).